Building a campfire is an essential outdoor skill that connects people to nature, tradition, and survival. Whether you’re an experienced camper or lighting your first fire, the process can be rewarding and a little intimidating. But with the right steps, safety practices, and some insider tips, anyone can master building a campfire that’s warm, efficient, and environmentally responsible.
There’s more to campfire building than just piling up wood and striking a match. A well-made fire gives warmth, light, cooking power, and even protection. But a poorly built fire can be smoky, hard to light, or even dangerous. Knowing the right techniques helps you enjoy the outdoors safely and confidently.
This guide will walk you through everything you need—from choosing the best spot and gathering materials, to lighting and maintaining your fire, to putting it out safely. You’ll also find answers to common questions, a few comparison tables, and tips even seasoned campers sometimes overlook.
Why Build A Campfire?
A campfire is more than just flames and heat. It’s a practical tool and a source of comfort in the wild.
- Warmth: Essential for staying comfortable on cold nights or drying wet gear.
- Cooking: Lets you prepare food and boil water, making meals more enjoyable and safe.
- Light: Provides visibility after dark, helping you move around camp.
- Safety: Can keep wild animals away from your campsite.
- Social: Brings people together, creating a sense of community and relaxation.
But beyond benefits, there are responsibilities. Campfires, if mismanaged, can cause wildfires or damage the environment. Building your fire the right way means respecting nature and keeping everyone safe.
Choosing The Perfect Campfire Spot
Where you build your campfire matters as much as how you build it. Picking the right location ensures safety, efficiency, and minimal impact on the environment.
Key Factors To Consider
- Distance from Flammable Objects: Stay at least 15 feet away from tents, trees, bushes, logs, and overhanging branches.
- Wind Direction: Set up your fire away from the wind to prevent sparks from spreading.
- Flat Ground: Look for a clear, level surface to ensure your fire is stable and doesn’t roll.
- Existing Fire Rings: Use a pre-made fire ring or pit if available. These areas are designed for safe burning and lower your impact on nature.
How To Prepare The Ground
If you must make your own fire pit:
- Clear a circle at least 4 feet wide.
- Remove grass, leaves, sticks, and roots.
- Dig down a few inches, exposing bare soil.
- Surround the pit with rocks if possible—this helps contain the fire.
Campfire Safety Zones
Here’s a quick comparison of common campsite fire locations:
| Fire Location | Pros | Cons |
|---|---|---|
| Existing Fire Pit | Safest, less environmental impact | May not be available everywhere |
| Cleared Flat Ground | Flexible, can choose best spot | More effort, higher risk if not careful |
| Next to Water Source | Easy access to water, lower fire risk | May disturb wildlife, risk of contamination |
Insider Tip: Many beginners forget to check local fire regulations or burn bans. Always ask the park ranger or check online before building a fire.
Gathering The Right Materials
Not all wood burns the same, and starting a fire is much easier with the right materials. You’ll need tinder, kindling, and fuel wood.
Understanding Firewood Types
- Tinder: Small, dry, and lights easily. Examples: dry leaves, pine needles, birch bark, cotton balls, commercial fire starters.
- Kindling: Small sticks about the thickness of a pencil to your thumb.
- Fuel Wood: Larger logs or branches, wrist-thick or bigger, for a long-lasting fire.
Here’s a table comparing common fire-starting materials:
| Material | Category | Ignition Speed | Best Use |
|---|---|---|---|
| Birch Bark | Tinder | Very Fast | Quick fire starting |
| Pine Needles | Tinder | Fast | Initial spark |
| Small Twigs | Kindling | Medium | Building up heat |
| Dry Branches | Fuel Wood | Slow | Maintaining fire |
| Wet Wood | Fuel Wood | Very Slow | Never for starting |
How Much Wood Should You Gather?
A common mistake is underestimating how much wood you need. As a rule of thumb, collect twice as much as you think. Fires burn through wood faster than most beginners expect.
- Tinder: Enough to fill two hands.
- Kindling: A bundle about the size of your forearm.
- Fuel Wood: A stack at least as tall and wide as your fire pit.
Pro Tip: Choose only dead, fallen wood. Never break branches from living trees. Live wood is wet, hard to burn, and damages the forest.
Campfire Building Techniques
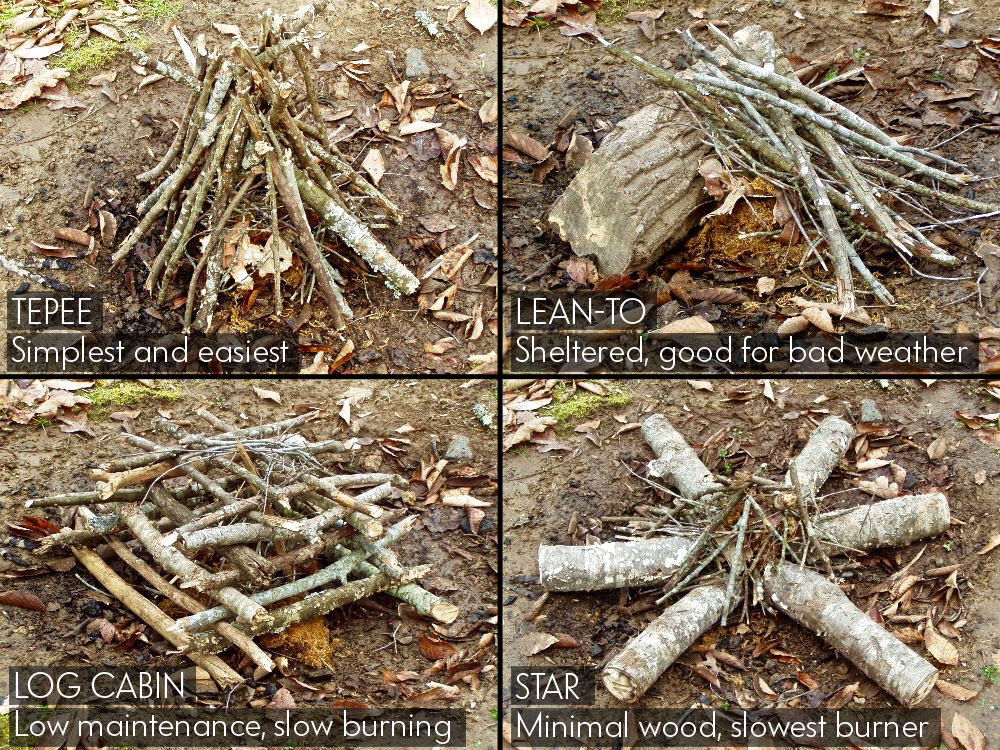
There are several classic ways to arrange your firewood. Each shape has different strengths, depending on your needs and the weather.
1. Teepee Fire
- How to Build: Stand tinder in the center. Lean kindling around it in a cone shape. Add small fuel wood around the kindling.
- Best For: Quick, hot fires. Good for cooking or when you need warmth fast.
- Downside: Burns quickly and needs frequent refueling.
2. Log Cabin Fire
- How to Build: Place two small logs parallel on the ground. Stack two more on top at a right angle, like building a log house. Fill the center with tinder and kindling.
- Best For: Longer, steadier fires. Great for social fires and when you want even heat.
- Downside: Takes more time and wood to build.
3. Lean-to Fire
- How to Build: Lay a thick stick on the ground. Lean smaller sticks against it, with tinder underneath.
- Best For: Windy conditions or damp weather. The large stick blocks the wind and helps the fire start.
- Downside: Not as strong for big groups.
4. Star Fire
- How to Build: Place five or six long logs radiating out from a central point, like spokes on a wheel. Light tinder and kindling in the center. Push logs inward as they burn.
- Best For: Conserving wood and easy fire control. Popular for long nights.
- Downside: Not as hot at first; needs attention.
Insider Insight: Many first-timers use too much wood at the start. Start small! Good airflow is more important than stacking lots of wood.

Credit: www.npr.org
Step-by-step: How To Build And Light A Campfire
Let’s put it all together, with a clear, practical sequence.
Step 1: Prepare The Site
- Clear your chosen spot of all debris.
- Build a fire ring with rocks if none exists.
- Keep water and a shovel nearby for emergencies.
Step 2: Lay Your Fire
- Choose your fire structure (teepee, log cabin, etc. ).
- Place dry tinder in the center.
- Arrange kindling above and around the tinder, leaving space for air.
- Stack fuel wood nearby, ready to add as the fire grows.
Step 3: Lighting The Fire
- Use matches or a lighter. Strike from the upwind side so the flame blows into the tinder.
- Light the tinder in several places for even burning.
- Gently blow at the base to feed oxygen, but not so hard you scatter ashes.
Step 4: Growing The Fire
- As the kindling catches, add more in small amounts.
- Once flames are steady, begin adding fuel wood. Start with smaller logs, then bigger as the fire strengthens.
- Never pile on too much at once—this can smother your fire.
Step 5: Maintaining The Fire
- Add wood as needed to keep a steady flame.
- Move unburned wood toward the center.
- Stir coals occasionally for even burning.
- Don’t leave your fire unattended, even for a minute.
Advanced Tip: Keep a long stick nearby to adjust logs and move embers safely without getting burned.
Campfire Safety And Environmental Care
Responsibility is the heart of campfire building. One careless moment can cause lasting damage. Here’s how to keep your fire safe and nature-friendly.
Before You Build
- Check for local burn bans, weather alerts, or special rules.
- Avoid fires during droughts or high winds.
During The Fire
- Keep your fire small and manageable.
- Never use gasoline or lighter fluid—these can cause flare-ups.
- Watch children and pets closely.
- Store extra wood and gear far from the fire.
After The Fire
- Completely extinguish the fire before you sleep or leave.
- Drown the fire with water. Stir ashes with a stick. Add more water until everything is cool to the touch.
- Never bury hot coals—they can smolder and restart later.
- Scatter cold ashes only if allowed, or pack them out in a metal container.
Leave No Trace
- Use established fire rings or fire pans when possible.
- Remove all traces of your fire, especially in backcountry areas.
- If fires are not allowed, respect the rules. Use a camp stove instead.
Non-obvious Mistake: Some campers underestimate wind changes. Even a small breeze can blow sparks far into dry grass. Always monitor the wind.
Cooking Over A Campfire
Campfire cooking adds a whole new level to your outdoor experience. The flavor, warmth, and fun are unbeatable. But there are tricks to getting it right.
Choosing Cooking Methods
- Direct Flame: Good for marshmallows or hot dogs, but easy to burn food.
- Hot Coals: Best for even, steady heat. Ideal for foil packets, grilling, or Dutch ovens.
- Campfire Grill: Place a metal grill over the fire for pots, pans, or burgers.
Temperature Control
Cooking over a fire is less precise than a stove. Use your hand to check temperature:
- Hold your hand above the coals, palm down.
- 2 seconds: Very hot (good for boiling)
- 4 seconds: Hot (best for grilling)
- 6+ seconds: Medium (roasting or simmering)
Move food or pans around to find the perfect spot.
Campfire Cooking Tips
- Let flames die down to glowing coals for most cooking.
- Use long-handled utensils to avoid burns.
- Rotate food for even heat.
- Clean up all food scraps to avoid attracting wildlife.
Hidden Insight: Many beginners try to cook over roaring flames. It’s better to wait for hot coals. They’re more predictable and less likely to burn your food.
Campfire Myths And Common Mistakes
Even experienced campers sometimes believe in fire-building “tricks” that don’t work, or repeat mistakes that cause frustration.
Myth 1: Bigger Fires Are Better
A huge fire wastes wood, creates more smoke, and is harder to control. Small, focused fires are safer and more efficient.
Myth 2: Use Green Wood For A Longer Burn
Green wood is full of moisture. It’s hard to light, produces lots of smoke, and doesn’t give much heat. Always use dry, seasoned wood.
Myth 3: You Need Lighter Fluid
Lighter fluid is unnecessary and dangerous. It can cause flare-ups and toxic fumes. Proper tinder and kindling are all you need.
Common Mistakes
- Using wet or rotten wood—creates smoke, not flame.
- Smothering the fire with too much wood at once.
- Not preparing enough tinder or kindling.
- Leaving a fire unattended, even briefly.
- Failing to put the fire out completely.
Pro Guidance: Always have a backup fire starter, like waterproof matches or a magnesium fire starter, especially in damp weather.
Campfire Etiquette
A good camper leaves the site better than they found it. Campfire etiquette keeps nature wild and makes the outdoors enjoyable for everyone.
Respect Quiet Hours
Avoid loud talking, music, or bright fires late at night. Let others enjoy peace and darkness.
Share Firewood
Don’t use more than you need. In popular areas, leave extra wood for the next group if you have it.
Be Mindful Of Smoke
Position yourself so smoke doesn’t blow into others’ tents or campsites.
Dispose Of Trash Properly
Never burn plastics, cans, or food wrappers. These release toxins and make a mess.
Non-obvious Insight: Some campers burn food scraps, thinking it’s harmless. This attracts animals and creates unnatural risks. Always pack out what you pack in.
Advanced Campfire Techniques
Once you’ve mastered the basics, there are ways to improve your campfire skills.
Building In Difficult Conditions
- Rainy Weather: Use birch bark, cotton balls with petroleum jelly, or commercial fire starters. Build a teepee with a roof of bark or large leaves.
- Snowy Ground: Dig down to soil if possible, or build a fire platform with rocks or green logs.
- Windy Days: Use a lean-to fire and build a windbreak with rocks, logs, or packs.
Making Char Cloth
Char cloth is a cotton fabric burned in a can with no air. It lights from a spark and helps start fires in any weather.
- Place a piece of 100% cotton cloth in a small metal tin with a tight lid.
- Put the tin in the coals for 5-10 minutes. It will smoke, then stop.
- Remove and let cool. The cloth should be black but not ash.
- Store in a dry bag for emergencies.
Using Fire Reflectors
A fire reflector is a wall of logs, rocks, or even a foil screen placed behind the fire. It directs heat toward your tent or cooking area, making the fire more efficient.
Campfire Signals
In survival situations, three fires in a triangle or straight line signal distress. This is a recognized emergency signal worldwide.
Expert Tip: Practice building a fire in your backyard or a safe area before your camping trip. Experience is the best teacher.

Credit: www.reddit.com
Campfire And Wildlife
Campfires can attract or repel wildlife, depending on how they’re managed.
- Attractants: Food smells, scraps, and even toothpaste attract animals like raccoons, bears, and skunks.
- Repellents: Smoke and flames often keep larger animals away, but never rely on a fire alone for safety.
Precaution: Store all food and scented items in bear-proof containers or hang them from a tree, away from your campsite.
Legal And Cultural Considerations
Campfire rules change depending on where you camp. In some areas, fires are banned all year due to wildfire risk. Some Indigenous lands have special rules or traditions about fire.
- Always check rules before you go.
- Respect cultural traditions—never build fires in sacred or off-limits areas.
- In high-risk seasons, use a portable stove instead.
For more on fire restrictions and safety, visit the National Park Service.
Troubleshooting: When Your Campfire Won’t Start
Even with all the right steps, sometimes a fire just won’t catch. Here’s how to solve common problems.
Problem: Wood Won’t Burn
- Solution: Make sure it’s dry. If not, split logs to expose the dry inside. Use more tinder and kindling.
Problem: Smoke, But No Flame
- Solution: Add more air—rearrange kindling for airflow. Too much wood can smother the fire.
Problem: Wind Keeps Blowing Out Your Match
- Solution: Shield the fire with your body or gear. Use a wind-resistant lighter or fire starter.
Problem: Fire Burns Down Quickly
- Solution: Add more fuel wood gradually. Make sure pieces are touching the coals for consistent burning.
Essential Campfire Gear
You don’t need fancy equipment, but a few items make fire building easier and safer:
- Lighter/Waterproof Matches: Reliable and compact.
- Fire Starter: Magnesium stick, commercial tabs, or cotton balls with petroleum jelly.
- Knife or Hatchet: For splitting kindling.
- Shovel or Trowel: For preparing the site and putting out the fire.
- Metal Bucket: For carrying water or safe ash disposal.
- Heat-Resistant Gloves: Useful for adjusting logs or handling hot cookware.
Here’s a quick gear comparison for fire starting:
| Fire Starter | Reliability | Weather Resistance | Ease of Use |
|---|---|---|---|
| Wooden Matches | Medium | Poor | Easy |
| Butane Lighter | High | Medium | Very Easy |
| Magnesium Stick | Very High | Excellent | Moderate |
| Ferro Rod | Very High | Excellent | Moderate |
| Commercial Tabs | High | Good | Very Easy |
Pro Tip: Carry at least two ways to start a fire. Wet weather or a lost lighter can ruin your plans.
Credit: www.atlasandboots.com
Teaching Kids About Campfire Safety
A campfire can be a memorable part of childhood, but safety comes first. Here’s how to teach kids to respect fire.
- Set Boundaries: Draw a line or circle around the fire that children can’t cross.
- Show, Don’t Just Tell: Demonstrate proper fire building and safety steps.
- Assign Tasks: Let kids help with gathering tinder or kindling, not lighting or tending the fire.
- Explain Dangers: Teach what can happen if rules are ignored.
- Supervise Constantly: Never leave children alone with a fire.
Surprising Fact: Kids learn best by doing. Let them help, but under strict guidance.
Campfire Alternatives
Sometimes, fires aren’t allowed or practical. Here are alternatives:
- Portable Camp Stoves: Safe, fast, and allowed almost everywhere.
- LED Lanterns: Good for light without smoke or sparks.
- Battery Heaters: Not as warm, but safe inside a tent.
Always have a backup plan if fire restrictions are in place.
The Lasting Impact Of A Good Campfire
A well-built campfire does more than heat or cook. It becomes the heart of your campsite—a place for stories, songs, reflection, and connection. Mastering this skill gives you a deeper respect for nature, a sense of accomplishment, and the ability to keep yourself and others safe.
Remember, each campfire leaves a mark. Build yours wisely, enjoy it fully, and leave nothing behind but memories.
Frequently Asked Questions
How Can I Tell If My Fire Is Really Out?
Stir the ashes with a stick. Add water until the ashes are cool to the touch. If you can’t touch them safely with your bare hand, add more water and stir again.
What’s The Best Wood For A Campfire?
Dry hardwoods like oak, maple, and hickory burn hotter and longer than softwoods like pine or spruce. But use what’s available—just make sure it’s dry and dead.
Can I Build A Campfire Anywhere?
No. Fires are not allowed in some parks, wilderness areas, or during burn bans. Always check local rules and use existing fire rings if available.
Is It Safe To Cook Directly On Campfire Flames?
It’s better to cook over hot coals than open flames. Flames burn food quickly and unevenly. Wait until you have a good bed of coals for best results.
What Should I Do If My Campfire Gets Out Of Control?
Have water and a shovel nearby. Douse the fire with water, stir, and add more water. If you can’t control it, call emergency services immediately.
Building a safe, enjoyable campfire is an art that combines skill, patience, and respect for nature. With practice and care, your fires will be the center of countless great outdoor memories.
