
Camping can be an amazing experience—until your tent pole snaps. Whether it’s a sudden gust of wind, a misplaced foot, or simple wear and tear, a broken tent pole can quickly turn a relaxing trip into a stressful problem. But with the right knowledge, you don’t have to panic.
Fixing a broken tent pole is a skill every camper should have. It’s easier than you might think, and with a little preparation, you can save your adventure from disaster. This guide will walk you through every step, from understanding your tent pole type to making solid repairs in the field or at home.
You’ll also learn which repair kits to trust, common mistakes to avoid, and tips for keeping your poles in top shape. By the end, you’ll feel confident tackling any tent pole problem.
Understanding Tent Pole Types
Before you fix a broken tent pole, it helps to know what you’re working with. Not all tent poles are the same, and each type needs different repair strategies. Let’s look at the most common materials and designs.
Main Materials
- Aluminum: These are popular because they’re light, strong, and resist corrosion. Most high-quality backpacking tents use aluminum poles.
- Fiberglass: Found in many budget or family tents, fiberglass is flexible but can splinter or shatter under stress.
- Carbon Fiber: Extremely light and stiff, but also the most brittle. Usually found in high-end, ultralight tents.
- Composite: A mix of materials for special tents, often custom designs.
Pole Construction
- Shock-corded: Most modern poles have an elastic cord running through the center, keeping sections together for easy setup.
- Single-section: One solid piece, rare except for small tents or specialty shelters.
- Multi-section: Breaks down for packing, the most common design.
Why Knowing Your Pole Type Matters
Aluminum poles can often be bent back or splinted easily. Fiberglass may need more careful splinting to avoid splinters. Carbon fiber is tricky—it needs precise splinting and taping. If you use the wrong fix for your material, you might make things worse.
Pro tip: Keep a note in your camping gear of your tent’s pole material and size. It makes repairs and finding the right parts much simpler.
Common Causes Of Tent Pole Breakage
Understanding how poles break can help you prevent it and repair wisely. Here are the main reasons tent poles fail:
- Strong Wind: Sudden gusts can bend or snap poles, especially if the tent isn’t properly staked out.
- Improper Assembly: Forcing sections together at the wrong angle can cause cracks or splits.
- Accidental Damage: Stepping on poles, dropping heavy items on them, or rough transport can cause breakage.
- Age and Fatigue: Over years of use, poles can develop micro-cracks or weakened joints.
- Manufacturing Defects: Rare, but sometimes materials have flaws that only show up under stress.
A study by outdoor gear manufacturer MSR found that over 60% of tent pole failures happen during setup or packing, not during storms. Being gentle and deliberate with your poles makes a big difference.
Credit: www.rei.com
Essential Tools And Repair Kits
When you’re out in the field, you need quick, reliable solutions. At home, you can take time for permanent fixes. Here’s what you need in both situations.
Field Repair Essentials
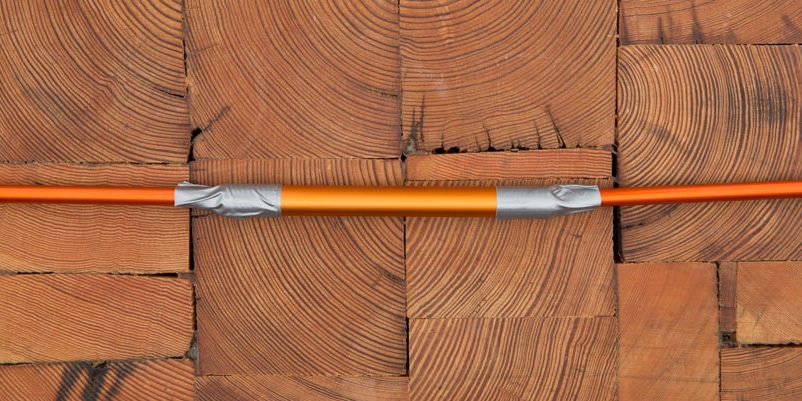
- Tent pole splint (sleeve): A metal or plastic tube that slides over the broken area for a quick fix.
- Duct tape or strong repair tape: Holds splints in place or temporarily binds cracks.
- Multi-tool or pliers: For bending metal, cutting tape, or removing sharp splinters.
- Extra shock cord: To replace or reinforce the inner cord if it snaps.
- Small file: Smooths rough edges that can cut fabric or hands.
At-home Repair Supplies
- Replacement pole sections: Get the same material and diameter for a long-lasting fix.
- Epoxy or super glue: For bonding cracks in fiberglass or carbon fiber poles.
- Sandpaper: Prepares surfaces for gluing or fitting new sections.
- Heat shrink tubing: Adds an extra layer of protection over repairs.
- Measuring tape: Ensures accurate cuts and fits.
- Rubber mallet: Helps fit new sections tightly without damaging them.
Comparing Field Vs. Home Repairs
Here’s a quick look at what’s best for each setting:
| Repair Situation | Best Tools | Repair Quality |
|---|---|---|
| In the Field | Splint, tape, multi-tool | Temporary but strong enough for trip |
| At Home | Replacement section, glue, mallet, sandpaper | Permanent and like new |
Non-obvious insight: Most campers rely only on duct tape, but a splint sleeve is often lighter and much more reliable. Always pack one in your tent bag.
Step-by-step Guide: Fixing A Broken Tent Pole In The Field
When you’re miles from home, speed and reliability matter. Here’s how to make a strong, quick repair that will last until your trip ends.
1. Assess The Damage
Remove the pole from your tent. Look for:
- Clean breaks (pole snapped in two)
- Cracks or bends
- Splintered fiberglass
If possible, wear gloves to avoid cuts from sharp edges.
2. Straighten The Pole (if Bent)
For aluminum, gently bend it back with your hands or a multi-tool. Don’t force it—small bends can be fixed, but big ones risk snapping. For fiberglass or carbon fiber, avoid bending; focus on splinting.
3. Use A Tent Pole Splint
Slide the splint or sleeve over the broken area. Center it so the break is in the middle. If the break is near a pole joint, move the splint as far as possible over solid material.
Pro tip: If the splint is too tight, use sandpaper or a file to smooth the pole ends.
4. Tape For Extra Security
Wrap duct tape or strong repair tape over both ends of the splint. Overlap the tape for maximum hold. For fiberglass, wrap extra tape to prevent splinters from poking through.
5. Re-thread The Shock Cord (if Needed)
If the shock cord inside is broken or slipped out, tie a new knot and thread it back through the pole sections. Use a thin wire or stiff string to help pull the cord.
6. Test The Pole
Once repaired, gently flex the pole to ensure it holds. If it feels weak, add more tape or support. Avoid putting too much tension on the repaired area when pitching the tent.
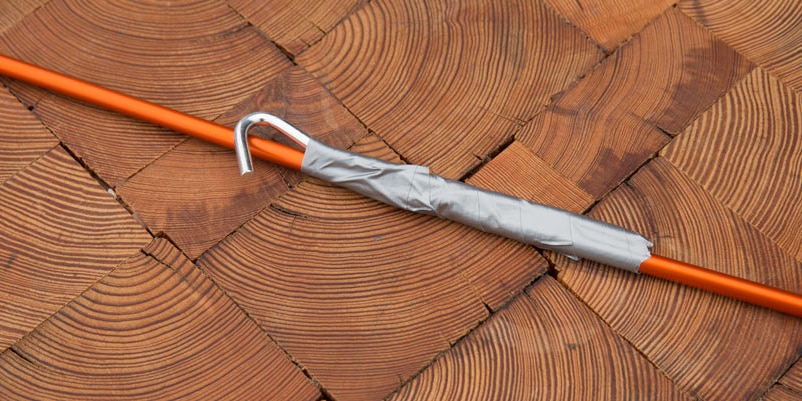
Example: On a windy night in Yosemite, one hiker used a tent stake as an emergency splint when he lost his repair sleeve. He taped it over the break, and his tent survived the storm.
Credit: www.rei.com
Permanent Repairs At Home
After your trip, don’t just leave the field repair in place. A proper fix will keep your tent pole strong for years. Here’s how to do it right.
1. Remove The Broken Section
If your pole has a broken or bent piece, remove it from the shock cord. If the cord is still good, tie a knot to stop it slipping back inside.
2. Measure And Cut Replacement
Buy a replacement section that matches your pole’s material and diameter. Use a measuring tape to get the exact length. Cut with a pipe cutter (for aluminum) or a hacksaw (for fiberglass).
Pro tip: Sand the ends of the new section to prevent sharp edges from damaging the shock cord.
3. Insert The Replacement
Thread the shock cord through the new section. If it’s tight, use a wire to guide the cord. Tie knots at each end to keep the cord in place.
4. Reinforce The Joint
For fiberglass or carbon fiber poles, add a small amount of epoxy glue at the joint. Slide heat shrink tubing over the repair, then heat it gently with a lighter or hair dryer.
5. Test The Pole
Assemble the full pole and flex it gently. If it bends smoothly and fits your tent, you’re good to go.
Non-obvious insight: Many campers forget to match the replacement section’s inside diameter, not just outside. This affects how the shock cord fits and whether the pole will flex correctly.
Fixing A Splintered Fiberglass Tent Pole
Fiberglass poles are common but can be tricky. When they break, they often splinter into sharp, needle-like pieces.
How To Safely Repair
- Wear gloves to avoid fiberglass splinters.
- Trim any loose, sharp ends with pliers.
- Use a splint sleeve (wider if possible) over the break.
- Wrap with tape tightly, starting 2–3 inches beyond each end of the break.
- If you have epoxy, add a small amount before taping to lock the fibers.
Warning: Never try to bend a splintered fiberglass pole straight. It can shatter further and become dangerous.
Field Vs. Home Repair Comparison
| Repair Type | Durability | Tools Needed | Suitability |
|---|---|---|---|
| Field Tape & Splint | Temporary (1-2 nights) | Splint, tape, gloves | Emergency use only |
| Epoxy & Replacement | Permanent | Epoxy, new section, mallet | Best for long-term |
Fixing A Bent Aluminum Tent Pole
Aluminum bends rather than snaps, but repeated bending weakens it. Here’s how to fix a mild to moderate bend.
- Remove the pole from the tent.
- Lay it on a flat surface and gently roll it to find the highest point of the bend.
- Apply gentle pressure with your hands or use a rubber mallet. Go slow—aluminum can snap if forced.
- If the bend is severe, cut out the damaged section and use a replacement.
Pro tip: Never use a hammer or rock directly on the pole. It can flatten the tube and make it impossible to fit sections together.
Repairing Carbon Fiber Tent Poles
Carbon fiber is light but brittle. If it cracks or snaps, treat it with care.
- Do not bend a cracked carbon pole.
- Splint with a sleeve that fits snugly over the break.
- Apply epoxy glue inside the sleeve for extra strength.
- Wrap with tape to prevent the sleeve from slipping.
- For major breaks, replace the section entirely.
Example: On a backcountry trip, a hiker repaired a cracked carbon pole using a bike tire repair sleeve and epoxy. It lasted the rest of the season.
Alternative Emergency Splints
If you lose your splint sleeve, improvise with what you have:
- Tent stake or peg: Tape it along the break.
- Metal utensil: Lightweight cutlery can work as a splint.
- Wooden stick: In a pinch, a sturdy stick and tape will hold.
These are not long-term solutions, but they can save your trip.
Common Mistakes To Avoid
Even experienced campers make errors when fixing poles. Here are the most frequent (and costly) mistakes:
- Using too much force: Over-bending aluminum or carbon poles can cause new cracks.
- Wrong sleeve size: If the splint is too loose or too tight, it won’t hold. Always check fit before your trip.
- Ignoring splinters: Especially with fiberglass, small splinters can tear your tent fabric.
- Leaving sharp tape edges: These catch on tent sleeves and can make assembly difficult.
- Skipping shock cord repairs: A loose or broken cord makes setup much harder and less stable.
Non-obvious insight: Many people fix the structural break but forget to sand rough edges. These can damage the tent, cut the cord, or even injure your hand during setup.

Credit: www.youtube.com
Preventing Future Breakage
Prevention is always easier than repair. Here’s how you can keep your tent poles healthy:
- Set up on flat ground: Avoid pitching on rocks or uneven surfaces.
- Stake out your tent fully: This reduces pressure on the poles during wind.
- Assemble poles section by section: Don’t “whip” them together, which stresses joints.
- Store poles loosely: Don’t keep them tightly bound or compressed for long periods.
- Inspect after each trip: Look for small bends, cracks, or worn cord.
- Lubricate joints: A tiny drop of silicone spray keeps aluminum poles sliding smoothly.
- Replace aging shock cord: If it loses elasticity, replace it before it snaps in the field.
Data point: Outdoor retailers report that replacing shock cord every 3–5 years dramatically reduces pole failures.
Best Tent Pole Repair Kits
There are many repair kits on the market. Here’s a quick comparison of the most popular ones:
| Kit Name | Includes | Material Compatibility | Average Price (USD) | User Rating |
|---|---|---|---|---|
| MSR Pole Repair Kit | Splints, tape, shock cord | Aluminum, fiberglass | $15–$20 | 4.7/5 |
| Coghlan’s Emergency Kit | Splint sleeve, pins | Aluminum, fiberglass | $7–$12 | 4.3/5 |
| Therm-a-Rest Field Kit | Splint sleeve, field instructions | Carbon fiber | $18–$25 | 4.5/5 |
Pro tip: Buy a kit that matches your tent’s pole material. Not all sleeves fit all diameters. Always check before your trip.
Real-world Examples: Fixes That Worked
Learning from others’ experiences can help you avoid mistakes. Here are some real fixes:
- Case 1: Windstorm Snap
A group camping in Utah faced a midnight windstorm. Their aluminum pole snapped near the joint. They used a repair sleeve and tape, slept through the night, and replaced the section at home.
- Case 2: Fiberglass Splinter
A family tent’s fiberglass pole split during setup. With gloves, they trimmed the splinters, taped a stick as a splint, and finished their trip. At home, they replaced the section and reinforced with epoxy.
- Case 3: Missing Sleeve
A solo backpacker lost his repair sleeve. He taped a tent stake over the break and finished his hike. He later bought a replacement kit.
Insight: Adaptability matters. Knowing several repair options prepares you for anything.
When To Replace, Not Repair
Sometimes repair isn’t enough. Here’s when you should replace your pole or section:
- Multiple breaks or cracks: Too many weak points mean the pole won’t hold under stress.
- Significant splintering: Especially with fiberglass, if fibers stick out everywhere, it’s unsafe.
- Bent beyond repair: Severe bends won’t flex properly and may tear your tent.
- Worn or broken shock cord: If the cord is frayed and can’t be replaced, the pole may be done.
Most tent manufacturers sell replacement pole sections or full sets. It’s worth the investment for safety and peace of mind.
Packing A Field Repair Kit: What To Include
Every camper should carry a small repair kit. Here’s a simple, effective setup:
- Splint sleeve (matched to your pole diameter)
- Duct tape or Tenacious Tape
- Small pliers or multi-tool
- Extra shock cord (at least 2 ft)
- Gloves (especially for fiberglass repairs)
- Small file or sandpaper
This kit weighs less than 4 oz but can save your entire trip.
Environmental Considerations
Repairing, rather than replacing, your tent poles is good for the environment. But when you do replace, recycle aluminum or carbon fiber poles if possible. Don’t leave broken poles or splinters in the wild—they can harm wildlife or other campers.
Learn more about responsible outdoor practices at the Leave No Trace Center for Outdoor Ethics.
Frequently Asked Questions
How Do I Find The Right Size Replacement Tent Pole Section?
Measure both the outside and inside diameter of your existing pole. Check your tent’s brand website for compatible parts. Take a section to your local outdoor store if you’re unsure—they often have sizing charts.
Can I Fix A Tent Pole Without A Splint Sleeve?
Yes, in an emergency you can use a tent stake, sturdy stick, or even a metal utensil as a splint. Tape it tightly over the break. Replace with a real sleeve as soon as possible.
Is It Safe To Camp With A Repaired Tent Pole?
A properly splinted pole is safe for short trips and mild weather. For longer trips or strong winds, replace or reinforce the repair at home before your next adventure.
How Long Does A Field Repair Last?
Most field repairs last 1–3 nights, depending on conditions and repair quality. Permanent repairs at home will last as long as the original pole if done correctly.
Are Tent Pole Repair Kits Universal?
No. Kits vary by pole material and diameter. Always check that the kit fits your tent’s specifications before your trip.
Camping is about adventure and resilience. Knowing how to fix a broken tent pole puts you in control, no matter what nature throws your way. With a little preparation and the skills you’ve learned here, you can keep your shelter safe, dry, and ready for any journey.
Safe travels, and may your tent stand strong wherever you go.
