Camping brings you close to nature, but it also comes with important decisions—especially about water. When you’re far from clean taps, you need a safe plan for drinking, cooking, and staying hydrated. Many campers struggle with water: carrying too much, not enough, or making mistakes with purification. Getting water right can mean the difference between a great adventure and a risky trip. In this article, you’ll learn the best ways to take water camping, from practical packing tips to smart purification methods, with real examples and clear advice.
Why Water Matters When Camping
Water is more than just a drink. It’s needed for cooking, cleaning, and basic hygiene. On average, a person needs 2–4 liters of water per day just for drinking. Add food preparation and washing, and the number increases. If you’re hiking, sweating, or in hot weather, you’ll need even more.
Dehydration is a real risk. Studies show even mild dehydration—just 2% loss of body weight—can cause headaches, fatigue, and poor decision-making. Many campsites don’t have reliable water sources. Knowing how much to bring, and how to get more, is essential.
Water also plays a crucial role in keeping your body temperature stable. When you sweat or breathe in dry air, you lose water faster. If you’re camping with kids or older people, remember they can be more sensitive to dehydration and need to drink regularly, even if they don’t feel thirsty.
In dry climates or at high altitudes, you might not notice how quickly you’re losing fluids. That’s why understanding your water needs is more important than most beginners realize.
Calculating Your Water Needs
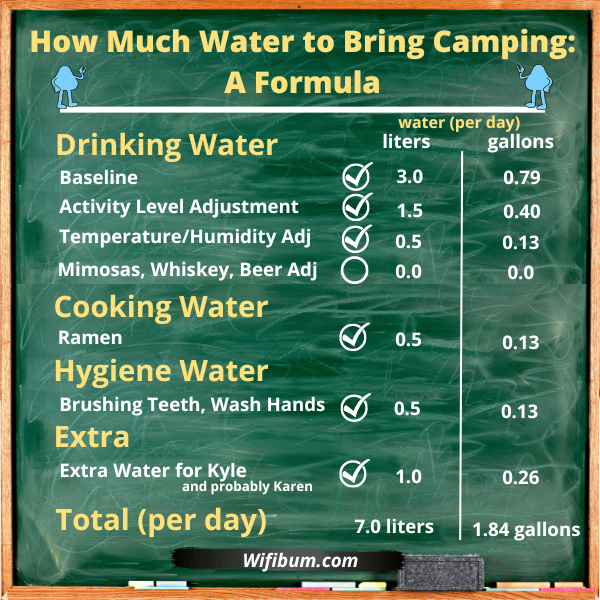
Before you pack, estimate how much water you’ll need. Here’s a simple method:
- Drinking: 2–4 liters per person per day (more if active or in heat)
- Cooking: 1–2 liters per meal (depends on food)
- Cleaning: 1–2 liters per day for washing hands, dishes, etc.
For a group of four camping two days:
- Drinking: 4 people x 3 liters x 2 days = 24 liters
- Cooking: 2 meals x 1.5 liters x 2 days = 6 liters
- Cleaning: 4 liters x 2 days = 8 liters
- Total: 38 liters
That’s about 10 gallons—heavy and bulky! Most campers can’t carry this much, so smart strategies are needed.
Don’t forget to adjust your calculations if you plan more physical activity or if the weather is very hot or cold. For example, if you plan to hike steep trails or play sports at camp, add an extra liter per person per day.
If you have pets, estimate at least 1 liter of water per pet per day. Some people make the mistake of only counting water for drinking, but underestimating the amount needed for cooking and washing is a common beginner’s error.
Main Ways To Take Water Camping
You have several options. The best method depends on your campsite, group size, and trip length.
1. Carry All Your Water
For short trips or dry locations, bringing all your water might be easiest. Use large containers, smaller bottles, or a mix. But carrying water is heavy: 1 liter = 2.2 pounds.
Pros:
- Guaranteed clean water
- No need for purification
Cons:
- Heavy and space-consuming
- Limits mobility
It’s practical for car campers or if your campsite is near your car. For example, if you’re camping at a festival or a state park with no water taps, carrying all your water in sturdy jugs can save you stress.
Some people freeze bottles before the trip, so they stay cold longer and help keep food chilled. But remember, as ice melts, space in your cooler changes.
2. Find Water At The Campsite
Many campsites have natural water sources: streams, lakes, or rivers. But never assume water is safe. Even clear water can carry bacteria, parasites, or chemicals.
Pros:
- Less weight to carry
- Unlimited supply (if available)
Cons:
- Needs purification
- Water might be contaminated or dry up
Always check recent reviews or park websites before your trip. In dry seasons, a stream you relied on last year might be gone. After heavy rain, water can look cleaner but may carry more germs from runoff.
3. Combination Approach
Most campers use a mix: carry some water, then refill and purify at the site. This balances weight and safety.
This approach is popular for backpackers who move between campsites. You might start with 2 liters per person, then refill whenever you reach a water source. This method requires solid planning—always have a backup in case your planned stream is not flowing.
Best Containers For Carrying Water
Choosing the right container matters. Here’s a comparison of common options:
| Container Type | Capacity | Weight (Empty) | Durability | Best Use |
|---|---|---|---|---|
| Plastic Bottles | 0.5–2 liters | Light | Medium | Day hikes, short trips |
| Hydration Bladders | 2–3 liters | Very light | High | Backpacking, active hiking |
| Jerry Cans | 5–20 liters | Heavy | Very high | Base camps, car camping |
| Collapsible Bags | 5–10 liters | Light | Medium | Flexible use, backup |
Hydration bladders fit inside backpacks, making drinking easy while hiking. The hose lets you drink hands-free, so you hydrate often without stopping. Jerry cans are strong and hold lots of water—great for car camping, but not for carrying far. Their wide mouths make them easy to fill and clean, but they can be awkward to pour. Collapsible bags save space but may tear if handled roughly.
A less obvious tip: Label your containers with their capacity and purpose (“drinking,” “cooking,” “cleaning”). This prevents confusion, especially in groups. Never use containers that once held chemicals or non-food substances, even if cleaned.
Water Purification Methods
If you’ll use natural sources, purification is essential. Waterborne illnesses are common and can ruin a trip. Here are the main ways to make water safe:
1. Boiling
Boiling kills most bacteria and viruses. Bring water to a rolling boil for at least 1 minute (3 minutes at high altitude). It works anywhere, but needs fuel and time.
Pros:
- Reliable
- Simple
Cons:
- Slow
- Uses fuel
If you’re low on fuel, boil only what you need for drinking and cooking. For washing, sometimes filtered (but not boiled) water is enough, but never for wounds or drinking.
2. Chemical Treatments
Drops or tablets (like chlorine dioxide or iodine) kill germs. Follow package instructions—usually 30 minutes. Taste can be unpleasant.
Pros:
- Lightweight
- Easy to pack
Cons:
- Chemical taste
- Doesn’t remove dirt
A tip: Some tablets need more time in cold water. Always read the label. If your water is cloudy, filter it first—chemicals don’t work well with lots of dirt or debris.
3. Filtration
Filters remove bacteria, parasites, and particles. Not all filters remove viruses. Pump filters, squeeze systems, and gravity bags are popular.
Pros:
- Fast
- No taste change
Cons:
- Can clog
- Needs maintenance
For group camping, gravity filters are easier because they process larger volumes with less effort. For solo campers, a squeeze or pump filter is lighter and faster. Always backflush or clean your filter after each trip to keep it working.
4. Uv Light
Portable UV pens destroy DNA of microbes. Swirl in bottle for about 90 seconds. Needs batteries and clear water.
Pros:
- Quick
- No chemicals
Cons:
- Doesn’t remove particles
- Device can break
If the water is cloudy, pre-filter through a cloth or coffee filter before using UV. Also, carry spare batteries. In cold weather, keep the device close to your body so it works properly.
Purification Comparison Table
Here’s a quick comparison:
| Method | Effectiveness | Time | Weight | Notes |
|---|---|---|---|---|
| Boiling | High | 5–10 min | Medium | Needs fuel |
| Chemical | Medium–High | 30–60 min | Very low | Taste issues |
| Filtration | High (except viruses) | 2–10 min | Low–Medium | Clogs if dirty |
| UV Light | High | 1–2 min | Low | Needs batteries |
A practical insight: Some campers combine methods—filter first, then use chemicals or UV for virus protection. This is good practice in places with known virus risks (for example, popular sites or international travel).
Smart Packing Strategies
Water takes space and weight. Here are practical ways to make packing easier:
- Use collapsible containers for backup water. They fit inside bags when empty.
- Spread water weight across group members. Everyone carries some.
- Reserve clean bottles for drinking, dirty for gathering.
- Pack purification gear together, so you don’t forget.
- Pre-fill containers before leaving home.
A non-obvious tip: Always pack a small extra bottle. If your main container leaks, you’ll have backup.
Also, consider bringing a bandana or coffee filter for pre-filtering dirty water before using your main filter or UV device. It takes up little space but can prevent clogs and save purification time. Some experienced campers even mark one bottle with a strip of tape as “emergency only”—used only if all other water is gone.
Getting Water From Nature
When using natural sources, take care. Look for clear running water—streams are safer than ponds. Avoid water downstream from farms, camps, or animals.
Here’s a step-by-step example:
- Find a flowing stream, not stagnant water.
- Fill your container without stirring up mud.
- Filter or treat water as soon as possible.
- Store purified water separately.
Many beginners forget to check upstream. If there’s a campsite or animal activity, move further up for cleaner water.
Look for signs of pollution—like algae blooms, oily film, or dead animals—and avoid those sources. In some places, even mountain water can be risky due to animal droppings (giardia risk). If you’re unsure, always treat or boil.
Water For Cooking And Cleaning
Cooking needs clean water. Dirty water can ruin taste and cause illness. If you’re short on water, use the minimum for boiling pasta or rice, and save the cooking water for washing dishes.
For cleaning, use biodegradable soap and rinse dishes away from the water source. Never wash directly in streams—this can pollute them.
Experienced campers use a “two-basin” system: one for washing, one for rinsing. This uses less water and keeps things cleaner. For stubborn food, wipe pans with a paper towel before washing. This reduces the amount of soapy water needed and keeps your water supply lasting longer.
Special Considerations For Different Camps
Car Camping
When driving to your site, you can bring more water. Use large containers and refill at the site if possible. Keep water in the shade and closed tight.
A smart tip: Bring a small funnel or spout for pouring from big containers into bottles. It prevents spills and waste, especially when kids are helping.
Backpacking
Weight is key. Carry only what you need, and plan to refill along the route. Research water sources beforehand; bring a filter and backup purification tablets.
Check recent trail reports online or ask local rangers about water levels. On some routes, water can be seasonal—full in spring, dry by late summer. Mark water sources on your map before you go.
Family Camping
With kids, plan extra water for spills and needs. Bring containers that are easy to pour and safe for small hands.
Kids often need more breaks for drinks, especially in hot weather. Bring a small cup for each child—this avoids fights over bottles and helps you track how much they drink.
Desert Camping
Water sources are rare. Always carry extra, and avoid dehydration. Drink small amounts often, not just when thirsty.
Wear light clothing and rest in shade during the hottest part of the day. If you get lost, stay put and conserve sweat by moving less.
Water Safety Tips
- Never drink untreated water from lakes or streams.
- Check local advisories—some areas have water contaminated with chemicals or heavy metals.
- Keep containers clean. Wash before and after trips.
- Store water away from fuel or chemicals.
- Don’t rely on just one purification method—if a filter breaks, have backup tablets.
Beginners often overlook the importance of redundancy. Having two ways to purify water prevents emergencies.
Another key point: If you’re using water from home, rotate your supply if it’s been stored for months. Old water can taste stale and may grow bacteria if not stored properly.
Best Practices For Water Storage
Keeping water safe is just as important as finding it. Here are key points:
- Use opaque containers to block sunlight, which can grow algae.
- Store water in cool places—heat speeds bacteria growth.
- Mark bottles “clean” and “dirty” to avoid confusion.
- Avoid containers that have held anything but water.
If you need to store water before a trip, add a date label. Water stored for longer than 6 months should be rotated. For long trips, clean containers with hot soapy water, rinse well, and air dry.
Example Packing List For A Weekend Camping Trip
For a family of four, here’s a sample water plan:
- 4 x 1-liter water bottles (for hiking)
- 2 x 10-liter collapsible bags (for cooking, cleaning)
- 1 pump filter
- 10 purification tablets (backup)
- Small bottles of biodegradable soap
This setup covers drinking, cooking, and cleaning, with backup for emergencies.
Add a small towel or bandana for pre-filtering, and a funnel for pouring between containers. If space allows, include a few extra empty bottles—they’re useful for unexpected needs or sharing with others.

Water Conservation Tips
Water is precious, especially in the wild. Here’s how to use less:
- Reuse cooking water for cleaning.
- Skip unnecessary washing—wipe dishes, don’t rinse every time.
- Share water among group for cooking and cleaning.
- Plan meals that need less water (like sandwiches).
Experienced campers save water by planning meals and cleaning routines ahead.
Another tip: Use wet wipes for quick cleaning, but pack them out. If you must wash, collect runoff in a small hole away from camp and fill it in when done.
Water And Weather: Adjusting Your Plan
Temperature and activity affect water needs. In hot weather, you’ll sweat more and need extra water. Cold weather can trick you—you may not feel thirsty, but you still need to drink.
If hiking at altitude, drink more. Air is dry and you lose water through breathing.
If you see your urine getting darker, that’s a sign you need to drink more. Set reminders to drink regularly, especially for kids and older adults. Even cloudy or rainy weather can dehydrate you if you’re active.
Avoiding Common Mistakes
Many campers make these errors:
- Underestimating water needs: Always plan for extra.
- Relying on a single water source: Streams can dry up.
- Forgetting purification backup: Filters can break.
- Ignoring container cleanliness: Dirty bottles can contaminate water.
A unique tip: Check your containers for leaks before the trip. Even new bottles can have faulty seals.
Don’t forget to check the condition of O-rings and seals on filters and bladders. Carry a spare cap or repair kit for your main water bottle or bladder. A small leak can turn into a big problem far from home.
Comparing Water Solutions For Different Trip Types
Here’s a summary for quick reference:
| Trip Type | Best Water Solution | Backup Needed? | Purification Method |
|---|---|---|---|
| Car Camping | Large jerry cans | Yes (small bottles) | Boiling or filter |
| Backpacking | Hydration bladder + filter | Tablets | Filter + chemical |
| Family Camping | Multiple bottles, collapsible bags | Extra containers | Boiling or filter |
| Desert Camping | Extra water, all carried | Extra bottles | N/A (no water sources) |
Trusted Sources For Water Safety
If you want more detailed information, check the Centers for Disease Control and Prevention’s guide on water treatment for campers and hikers: CDC Healthy Water.
Frequently Asked Questions
How Much Water Should I Bring Camping?
Most campers need 2–4 liters per person per day just for drinking. Add 1–2 liters for cooking and cleaning. Always bring extra in case of emergencies.
Can I Drink Water Straight From A River Or Lake?
No. Water from nature can contain bacteria, parasites, or chemicals. Always purify using boiling, filtering, or chemical treatments.
What’s The Safest Way To Purify Water?
Boiling is most reliable, but filtering and chemical treatments are also safe when used correctly. UV light works well if you have clear water and working batteries.
How Do I Pack Water For Backpacking?
Use lightweight containers like hydration bladders. Carry some water, then plan to refill and purify at natural sources along the way. Always bring backup purification, like tablets.
What Should I Do If My Water Filter Breaks?
Always carry a second purification method, like chemical tablets or a small boiling pot. Never rely on just one solution.
Camping is more enjoyable when you’re confident about water. By planning ahead, packing smart, and using the right purification method, you can stay safe, hydrated, and focused on adventure. Remember—water is life in the wild. Good preparation means more fun and fewer worries.