Freeze drying food at home has become a popular way to preserve ingredients while keeping their flavor, texture, and nutrients. Many people think you need expensive machines to do this, but there’s a simple method using dry ice. Dry ice is the solid form of carbon dioxide, and it can freeze dry food without special equipment. If you want to store food for emergencies, hiking, or just to keep your favorite fruits longer, learning how to freeze dry food with dry ice is a practical skill. In this guide, you’ll discover the science behind freeze drying, step-by-step instructions, safety tips, and how to get great results with everyday foods.
Understanding Freeze Drying
Freeze drying, also called lyophilization, is a process that removes water from food by freezing it and then reducing the surrounding pressure to allow the frozen water to turn directly into vapor. This keeps most of the food’s structure, taste, and nutrition. The result is lightweight, crunchy food that can last for years if stored properly.
The traditional freeze drying process uses expensive machines, but dry ice can mimic this effect at home. Dry ice is extremely cold (-109°F or -78°C) and evaporates directly from solid to gas—a process called sublimation. When you pack food with dry ice, it freezes quickly and the dry ice vapor helps pull moisture from the food.
Why Freeze Dry Food?
Freeze drying has several benefits compared to other methods like dehydration or canning:
- Long shelf life: Freeze dried food can last 10–25 years if kept dry and sealed.
- Lightweight: Perfect for camping, hiking, or emergency kits.
- Retains nutrients: Most vitamins and minerals stay intact.
- Flavor and texture: Foods taste fresh and often stay crispy.
- Quick rehydration: Just add water to restore the original texture.
Many hikers, preppers, and home cooks use freeze dried foods for convenience and nutrition. For example, freeze dried strawberries can last over a decade, while dehydrated ones last just 1–2 years.

Credit: www.youtube.com
Dry Ice Vs. Machine Freeze Drying
How does the dry ice method compare to professional machines? Here’s a quick overview:
| Factor | Dry Ice Method | Machine Method |
|---|---|---|
| Cost | Low ($20–$50 per batch) | High ($2,000–$5,000 for machine) |
| Ease of Use | Simple, but manual | Automated |
| Food Quality | Very good, but slightly less uniform | Excellent, consistent |
| Batch Size | Small (1–2 lbs) | Large (up to 10 lbs) |
| Time Required | 24–48 hours | 18–36 hours |
| Safety | Requires handling dry ice | Safe, enclosed system |
Most home users prefer the dry ice method for its affordability and simplicity, even if it’s slower and requires more hands-on work.
What Foods Can You Freeze Dry With Dry Ice?
You can freeze dry many foods using dry ice:
- Fruits: Strawberries, bananas, apples, blueberries
- Vegetables: Peas, corn, carrots, bell peppers
- Cooked meats: Chicken, beef, turkey (lean and shredded work best)
- Herbs: Basil, parsley, mint
- Prepared meals: Soups, stews, pasta (with low oil content)
Some foods don’t freeze dry well:
- High-fat foods (like cheese, butter, and fatty meats) can spoil faster.
- Foods with lots of sugar (like jams) may stay sticky.
- Liquid-rich foods (like watermelon) may not dry evenly.
How Dry Ice Freeze Drying Works
The process relies on two key ideas:
- Rapid freezing: Dry ice freezes food much faster than a normal freezer, locking in freshness.
- Sublimation: The dry ice itself turns directly into gas, lowering humidity and pressure in the container. This encourages water in the food to also sublimate—from ice to vapor—leaving the food dry.
It’s important to know that this method doesn’t remove 100% of water, but it gets close enough for long-term storage if you follow best practices.
Equipment And Ingredients Needed
To freeze dry food with dry ice, you’ll need:
- Dry ice: About 1–2 pounds per pound of food
- Fresh food: Clean, sliced, and prepped
- Large cooler: Styrofoam or plastic works best
- Wire rack or baking sheet: To keep food elevated
- Heavy-duty freezer bags or vacuum bags
- Insulated gloves: For handling dry ice safely
- Safety goggles: Optional, but smart for beginners
- Permanent marker: For labeling bags
For example, if you want to freeze dry 2 lbs of strawberries, buy 3–4 lbs of dry ice and use a medium-sized cooler.
Step-by-step: How To Freeze Dry Food With Dry Ice
Follow these steps to freeze dry food at home:
1. Prepare The Food
- Wash and slice fruits and vegetables into small, uniform pieces. Smaller pieces freeze and dry faster.
- Cook meats and remove as much fat as possible. Shred or cut into thin slices.
- For meals, cool and portion into small servings.
Non-obvious insight: Don’t mix different types of food in one batch. Fruits and meats release different gases and moisture, which can affect drying.
2. Arrange Food In The Cooler
- Place the wire rack or baking sheet inside the cooler.
- Lay out the food in a single layer. Avoid stacking pieces.
- Leave space around each piece for air flow.
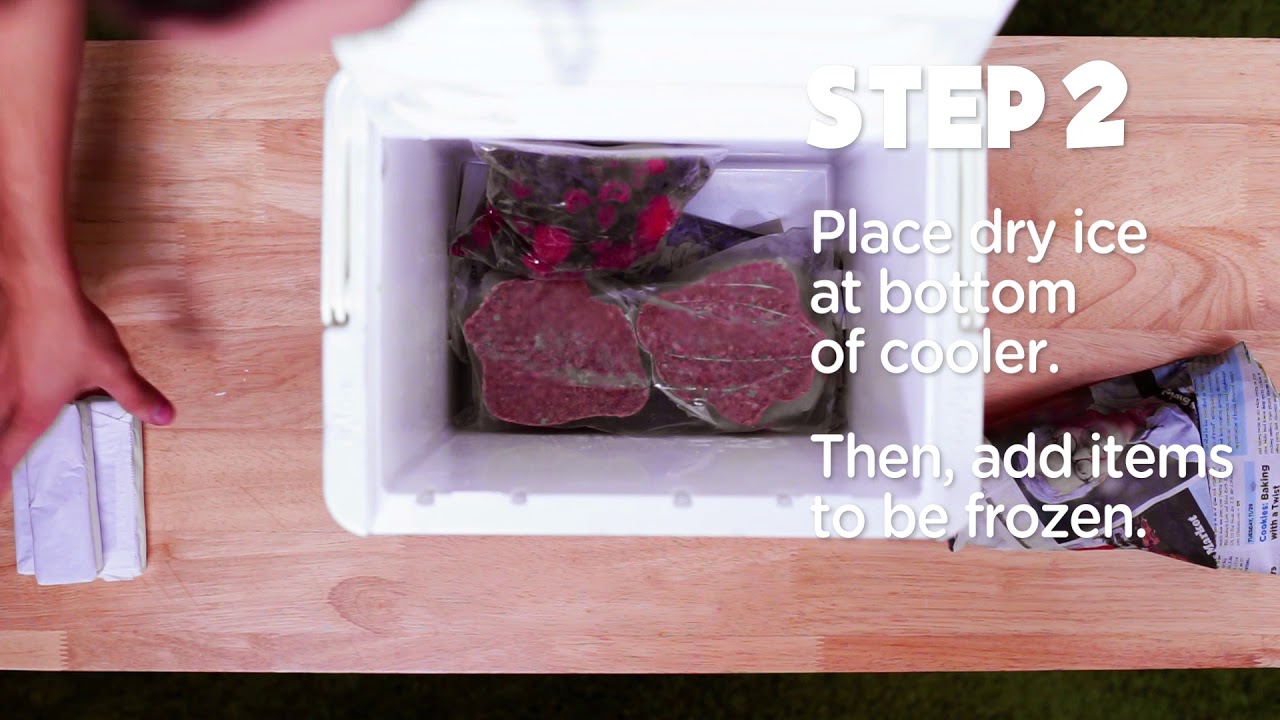
3. Add Dry Ice
- Put on insulated gloves before handling dry ice.
- Place dry ice beneath the rack, NOT directly on the food. This prevents freezer burn.
- For large batches, put extra dry ice around the sides.
Practical tip: If you notice frost building up on the food, reposition the dry ice to improve circulation.
4. Seal The Cooler
- Close the cooler, but leave a small gap or vent. Dry ice needs to evaporate, and pressure can build up.
- If using a styrofoam cooler, poke small holes for ventilation.
Common mistake: Sealing the cooler tightly can cause it to burst. Always allow gas to escape safely.
5. Wait For Freeze Drying To Complete
- The process usually takes 24–48 hours.
- Check every 12 hours. Dry ice should still be present. If it’s gone, add more.
- Food is freeze dried when it is completely dry, crisp, and no longer cold to the touch.
6. Package And Store
- Immediately transfer dried food to vacuum bags or heavy-duty freezer bags.
- Remove as much air as possible. Use a vacuum sealer for best results.
- Label each bag with the food type and date.
Non-obvious insight: Adding a small packet of silica gel can help absorb leftover moisture and extend shelf life.
7. Store Properly
- Keep freeze dried food in a cool, dark place.
- Avoid humidity and temperature swings.
If stored correctly, freeze dried fruits and vegetables can last up to 25 years. Meats last 5–10 years.
Safety Tips When Using Dry Ice
Dry ice is safe if you follow basic rules:
- Never touch dry ice with bare hands. It can cause severe burns.
- Use insulated gloves and handle dry ice gently.
- Work in a well-ventilated area. The gas from dry ice (carbon dioxide) can build up and cause headaches or dizziness.
- Don’t store dry ice in a sealed container. Pressure can cause explosions.
- Keep dry ice away from children and pets.
Extra tip: If you spill dry ice, let it evaporate naturally. Never try to dispose of it down a sink or toilet.
Credit: www.youtube.com
Freeze Drying Efficiency: Comparing Methods
Here’s a comparison of drying efficiency for different foods and methods:
| Food Type | Dry Ice Method (Time) | Machine Method (Time) | Dehydrator (Time) |
|---|---|---|---|
| Strawberries | 24–36 hrs | 18–24 hrs | 8–12 hrs |
| Chicken | 36–48 hrs | 24–36 hrs | 10–14 hrs |
| Carrots | 30–36 hrs | 20–28 hrs | 6–10 hrs |
| Herbs | 24–30 hrs | 16–20 hrs | 4–8 hrs |
Freeze dried foods last much longer and keep more nutrients compared to dehydrated foods, even if the process takes a bit more time.
Packaging And Storage: Maximizing Shelf Life
Proper packaging is critical. Here’s how to keep food safe for years:
- Use vacuum-sealed bags for best results.
- Add oxygen absorbers if storing for more than 2 years.
- Label each package with the date and contents.
- Store in a cool, dry, dark place.
Non-obvious insight: Even a tiny amount of moisture can cause spoilage. Always check bags for leaks or condensation before storing.

Credit: stayfreshfreezedry.com
Troubleshooting: Common Problems And Solutions
Food Isn’t Dry Enough
- Solution: Add more dry ice or extend drying time. Check for moisture by breaking a piece—if it’s chewy, it’s not ready.
Food Tastes Bland
- Solution: Add seasoning before drying. Freeze drying can make flavors milder, so a little extra salt or spices can help.
Food Turns Brown
- Solution: This usually happens if food isn’t frozen quickly enough. Use thinner slices and more dry ice.
Freezer Burn
- Solution: Don’t place food directly on dry ice; use a rack.
Cooler Leaks Gas
- Solution: Check for cracks. Always use a cooler that seals but allows gas to escape.
Real-world Example: Freeze Drying Strawberries
Let’s walk through a practical example:
- Buy 2 lbs of fresh strawberries and 3 lbs of dry ice.
- Wash, hull, and slice strawberries into thin pieces.
- Arrange slices on a wire rack inside a styrofoam cooler.
- Place dry ice under the rack, around the sides.
- Close cooler, leaving a small vent.
- Wait 30–36 hours, checking every 12 hours. Add more dry ice if needed.
- When strawberries are crisp, package in vacuum bags with an oxygen absorber.
- Store in a cool, dry place. Enjoy for years!
Cost Analysis: Dry Ice Freeze Drying
Is it cost-effective? Let’s break down the numbers.
| Item | Dry Ice Method (per batch) | Machine Method (per batch) |
|---|---|---|
| Food (2 lbs) | $6–$10 | $6–$10 |
| Dry Ice | $15–$25 | N/A |
| Cooler | $10–$20 (one-time) | N/A |
| Vacuum Bags | $3–$6 | $3–$6 |
| Machine | N/A | $2,000–$5,000 (one-time) |
| Total Cost | $24–$41 | $9–$16 (+ machine cost) |
Dry ice freeze drying is much cheaper for occasional users. If you plan to freeze dry food often, investing in a machine may pay off over time.
Practical Tips For Beginners
- Start with fruits. They are easy to freeze dry and taste great.
- Use thin slices. This speeds up drying and improves texture.
- Don’t rush. Give food enough time to dry completely.
- Check food regularly. If food is soft or cold, keep drying.
- Label everything. It’s easy to forget what’s in each bag after a few months.
Many beginners miss the importance of ventilation and separating foods by type. Mixing foods can cause flavors to blend and drying to slow.
Environmental Impact
Dry ice is made from recycled carbon dioxide, so it doesn’t add new greenhouse gases when used properly. However, always dispose of dry ice responsibly—let it evaporate outside, not in a closed room.
Freeze dried food creates less waste than canned food, as you can portion exactly what you need.
When To Use Freeze Dried Foods
Freeze dried foods are ideal for:
- Emergency kits and disaster prep
- Camping and hiking trips
- Lightweight snacks
- Quick meal prep
- Reducing food waste
For example, hikers often carry freeze dried meals because they’re light and easy to rehydrate.
External Resources
For more in-depth information on freeze drying science, visit Wikipedia.
Frequently Asked Questions
What Is The Difference Between Freeze Drying And Dehydrating?
Freeze drying removes water by freezing and sublimating, while dehydrating uses heat to evaporate water. Freeze dried foods last longer, keep more nutrients, and have better texture.
Can You Freeze Dry Cooked Meals With Dry Ice?
Yes, but stick to meals with low fat and sugar. Cool the meal first, portion it into small sizes, and follow the same dry ice process. Soups and stews work well if they don’t contain dairy or lots of oil.
How Do You Know When Food Is Fully Freeze Dried?
Food should be crisp, dry, and not cold. Break a piece—if it snaps, it’s ready. If it bends or feels moist, keep drying.
Is Freeze Dried Food Safe To Eat?
If prepared and stored correctly, freeze dried food is safe. Always use clean equipment, dry ice, and airtight packaging. Check for signs of spoilage before eating.
Can You Freeze Dry Dairy Products With Dry Ice?
Most dairy doesn’t freeze dry well. Yogurt and low-fat milk can work, but cheese and butter spoil quickly. If you try, use small portions and check for moisture often.
Freeze drying food with dry ice is a practical, affordable way to preserve your favorite ingredients. With careful preparation, attention to safety, and proper storage, you can enjoy crisp, flavorful foods for years. Whether you’re planning for emergencies, outdoor adventures, or just want to cut food waste, the dry ice method puts freeze drying within everyone’s reach.