Camping bread brings a special joy to outdoor adventures. There’s something about baking bread over a fire, under the open sky, that makes it taste richer. For many campers, fresh bread is a treat that feels almost impossible away from home.
But it’s easier than you think. With a few simple ingredients and basic tools, you can make warm, fresh bread at your campsite. This guide will show you how, whether you’re a beginner or already comfortable outdoors.
You’ll learn about different methods, step-by-step recipes, and practical tips for success. We’ll cover common mistakes, ingredient choices, cooking techniques, and equipment. Plus, you’ll see comparison tables to help you pick the best options for your trip. By the end, you’ll know exactly how to make camping bread that’s delicious, safe, and easy to customize.
Why Make Bread While Camping?
Bread is one of the most basic foods in the world. It’s filling, easy to eat, and goes well with almost anything. Making bread at your campsite gives you:
- Fresh flavor: Store-bought bread can taste stale after a few days. Homemade bread is warm and fragrant.
- Comfort: Bread is familiar and satisfying, especially after a day outdoors.
- Versatility: You can eat it with soup, cheese, or just butter.
- Fun: Baking bread together brings people closer and adds excitement to your camping experience.
Some campers worry that baking bread is too hard or needs special equipment. But you don’t need fancy tools. You just need a few ingredients, heat, and a little patience.
Basic Ingredients For Camping Bread
The simplest bread recipes use only a few ingredients. Here’s what you’ll need for most camping bread:
- Flour – All-purpose flour is the best choice. You can also use whole wheat flour for more fiber.
- Water – Clean, cold water.
- Salt – For flavor.
- Yeast or baking powder – Yeast gives traditional bread texture; baking powder is used for quick breads like bannock.
- Oil or fat – Optional, for richer taste and softer texture.
Some recipes use milk powder, honey, or sugar for extra flavor. For camping, keep it simple. You can always add spices, dried fruit, or seeds if you want.
Typical Camping Bread Ingredient Quantities
For one loaf or batch (serves 4-6):
- Flour: 2 cups
- Water: 3/4 cup
- Salt: 1 teaspoon
- Yeast: 1 teaspoon (or 2 teaspoons baking powder for quick bread)
- Oil: 2 tablespoons (optional)
These are easy to pack and measure at the campsite. If you’re baking for more people, double the quantities.
Choosing The Right Method: Fire, Stove, Or Dutch Oven?
You can bake bread at a campsite using several methods. Each has its own pros and cons. Your choice depends on your gear, group size, and how much effort you want to invest.
Here’s a clear comparison of popular methods:
| Method | Pros | Cons | Best For |
|---|---|---|---|
| Campfire (stick or stone) | Fun, no equipment needed, rustic flavor | Uneven heat, can burn easily | Solo campers, kids, quick bread |
| Portable stove (skillet, pan) | Controlled heat, easy cleanup | Limited size, not true baking | Small groups, short trips |
| Dutch oven | Excellent crust, large batch, real baking | Heavy, needs charcoal or campfire | Families, longer trips, serious bakers |
Most campers use the Dutch oven for classic bread, but you can make tasty flatbreads or bannock with just a skillet or even a stick.
Step-by-step Recipe: Classic Dutch Oven Camping Bread
Let’s start with the most popular recipe: Dutch oven bread. This method creates a crusty loaf, similar to artisan bread at home.
Ingredients
- 2 cups all-purpose flour
- 1 teaspoon salt
- 1 teaspoon instant yeast
- 3/4 cup water
- 2 tablespoons oil (optional)
- Extra flour for dusting
Equipment
- Dutch oven (8-12 inches)
- Lid lifter or tongs
- Mixing bowl
- Spoon or spatula
- Charcoal or wood for campfire
Steps
- Mix the dough: In a bowl, combine flour, salt, and yeast. Add water and oil. Stir until a sticky dough forms. If too dry, add a tablespoon of water.
- Knead: Sprinkle flour on a clean surface. Knead dough for 5-10 minutes, until smooth.
- Rise: Place dough in the bowl, cover with a towel. Let rise for 30-60 minutes. In cold weather, let it rise longer.
- Prepare Dutch oven: Heat Dutch oven over fire or coals for 10 minutes. Sprinkle some flour inside to prevent sticking.
- Shape and bake: Place risen dough in Dutch oven. Cover with lid. Place oven over hot coals. Put extra coals on lid for even heat.
- Bake: Cook for 30-40 minutes. Check after 25 minutes. Bread is done when crust is golden and a toothpick comes out clean.
- Cool and enjoy: Let bread rest for 10 minutes. Slice and serve with butter or jam.
Estimated cooking time: 1 hour (including rising)
Serving size: 4-6 people
Practical Tips
- If you don’t have yeast, use baking powder instead. The bread will be more like bannock.
- For a smoky flavor, use wood coals instead of charcoal.
- To prevent burning, rotate the Dutch oven every 10 minutes.
Quick Bread Recipe: Bannock For The Campfire
Bannock is a traditional camping bread, popular with hikers and scouts. It’s fast, doesn’t need yeast, and can be cooked on a skillet or stick.
Ingredients
- 2 cups all-purpose flour
- 2 teaspoons baking powder
- 1 teaspoon salt
- 2 tablespoons oil or melted butter
- 3/4 cup water
Equipment
- Skillet or frying pan
- Campfire or portable stove
- Mixing bowl
Steps
- Mix dry ingredients: Combine flour, baking powder, and salt in a bowl.
- Add wet ingredients: Pour in water and oil. Mix until dough forms.
- Shape: Pat dough into a flat disk about 1 inch thick.
- Cook: Heat skillet over fire. Place dough in skillet. Cook for 5-7 minutes per side, until golden.
- Serve: Cut into wedges and eat warm.
Estimated cooking time: 15-20 minutes
Serving size: 4 people
Variations
- Add dried fruit, nuts, or herbs for extra flavor.
- Bannock can also be cooked on a stick. Wrap dough around a clean stick and hold over fire.
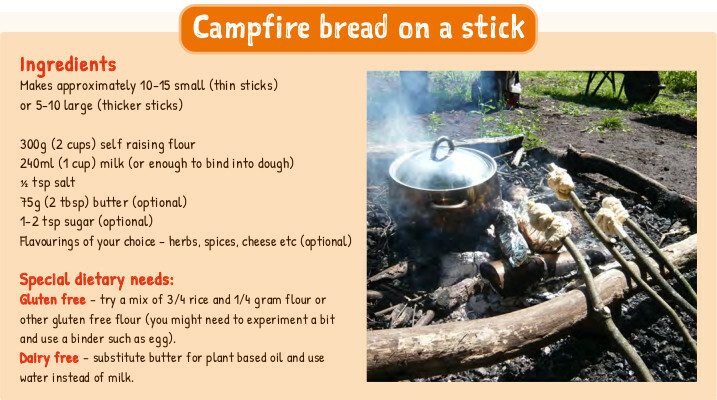
No-equipment Option: Bread-on-a-stick
If you don’t have a skillet or oven, you can still make bread. Bread-on-a-stick is fun, especially for kids.
Ingredients
- 1 cup flour
- 1/2 teaspoon salt
- 1 teaspoon baking powder
- 1/3 cup water
Equipment
- Clean, sturdy stick (about 1 inch thick)
- Campfire
Steps
- Make dough: Mix flour, salt, baking powder, and water.
- Shape: Roll dough into a long rope.
- Wrap: Spiral dough around stick, leaving space between turns.
- Cook: Hold stick over fire, turning often. Bread is done when golden and firm (8-12 minutes).
- Eat: Slide off the stick and enjoy.
Estimated cooking time: 10-15 minutes
Serving size: 1-2 people
Tips
- Use hardwood sticks, not pine, to avoid sap.
- Let dough cool before eating, as the inside can be very hot.
Comparing Camping Bread Recipes
Choosing the right recipe depends on your time, group size, and equipment. Here’s a comparison of three main options:
| Recipe | Prep Time | Cook Time | Serving Size | Equipment Needed |
|---|---|---|---|---|
| Dutch oven bread | 10 min | 30-40 min | 4-6 | Dutch oven, bowl |
| Bannock (skillet) | 5 min | 15-20 min | 4 | Skillet, bowl |
| Bread-on-a-stick | 5 min | 10-15 min | 1-2 | Stick, bowl |
If you’re short on time, bannock or bread-on-a-stick is best. For a group, Dutch oven bread gives larger portions.
Essential Equipment For Baking Bread Outdoors
You don’t need a lot of gear, but having the right tools makes camping bread easier.
Must-haves:
- Mixing bowl: Any lightweight bowl works.
- Utensil: Spoon or spatula.
- Heat source: Campfire, charcoal, or stove.
- Cooking vessel: Dutch oven, skillet, or stick.
Optional but helpful:
- Measuring cup: For accuracy.
- Thermometer: To check bread temperature (internal temp should be 190°F).
- Cooling rack: Helps bread stay crispy.
Lightweight Equipment Comparison
| Item | Weight | Portability | Best Use |
|---|---|---|---|
| Dutch oven (8-inch) | ~10 lbs | Low | Car camping, groups |
| Skillet (aluminum) | ~1 lb | High | Backpacking, small groups |
| Stick | 0 lbs | Very high | Minimalists, kids |
For backpackers, a skillet or stick is best. For car campers, a Dutch oven adds versatility.
Common Mistakes And How To Avoid Them
Even experienced campers make mistakes with bread. Here’s how to fix the most common problems:
- Burnt crust, raw inside: Too much heat, not enough time. Move bread away from direct fire, and cook slower.
- Dense bread: Not enough kneading or rising time. Knead well, and let dough rise fully.
- Sticky dough: Too much water. Add flour gradually until dough is workable.
- Sticking to pan: Not enough oil or flour. Grease pan or sprinkle with flour before baking.
- Flat bread: Forgot to add yeast or baking powder. Double-check ingredients before mixing.
Non-obvious insight: If it’s windy or cold, bread takes longer to cook. Shield your fire or cooking vessel to keep heat stable.
Customizing Your Camping Bread
Plain bread is tasty, but you can add extra flavors to make it special. Here are some ideas:
- Herbs: Rosemary, thyme, or oregano.
- Cheese: Mix grated cheese into dough.
- Sweet touches: Raisins, dried cranberries, cinnamon, honey.
- Seeds and nuts: Sunflower seeds, pumpkin seeds, walnuts.
Try adding one or two extras at a time. Too many additions can make bread dense.
Example: Garlic And Herb Bannock
- Add 1 tablespoon chopped garlic and 2 teaspoons dried herbs to the basic bannock recipe.
- Mix well, cook as usual.
- Serve with soup or grilled meat.
Safety Tips For Cooking Bread Outdoors
Cooking over fire is fun, but safety matters. Follow these tips:
- Keep water nearby: Always have water for emergencies.
- Supervise kids: Children should be watched when cooking.
- Use heat-proof gloves: When handling hot pans or Dutch ovens.
- Check local rules: Some areas ban campfires. Use stoves or check for fire-safe zones.
- Clean up: Don’t leave crumbs or food waste. Animals can be attracted to your campsite.
Non-obvious insight: Bread crumbs can attract ants and small animals. Store leftovers in sealed bags.
Storing And Packing Bread Ingredients
Bread ingredients are easy to carry. Here’s how to pack them:
- Pre-mix dry ingredients: Combine flour, salt, and yeast or baking powder in a zip bag.
- Pack liquids separately: Carry water in bottles; oil in small containers.
- Keep yeast cool: Instant yeast lasts longer if kept dry and cool.
- Bring extras in small bags: Herbs, spices, and dried fruit can be packed in snack-size bags.
If you want to save space, use powdered milk or butter instead of fresh.
Bread For Special Diets
Some campers have dietary needs. You can adjust camping bread for:
- Gluten-free: Use gluten-free flour. Add 1/2 teaspoon xanthan gum for better texture.
- Vegan: Use oil instead of butter, and skip milk or eggs.
- Low-sodium: Reduce salt, add more herbs for flavor.
For best results, test your recipe at home before your trip.
Bread As Part Of A Complete Camping Meal
Bread is more than a side dish. You can use it for:
- Sandwiches: Fill with cheese, meat, or veggies.
- Dipping: Serve with soup or stew.
- Breakfast: Top with jam or honey.
- Pizza: Use flatbread as a base; add toppings and cook briefly.
Bread helps stretch meals, making your food last longer.
Weather Challenges: Baking In Rain, Wind, Or Cold
Outdoor cooking depends on weather. Here’s how to manage:
- Rain: Use a tarp or tent to shield your cooking area.
- Wind: Build a windbreak with rocks or logs. Bread may need longer cooking time.
- Cold: Bread dough rises slower. Let it rise in a warm spot, like near your sleeping bag.
Non-obvious insight: In high altitudes, bread rises faster but can collapse easily. Use less yeast, and watch closely.
Cleaning Up After Baking Bread
After eating, cleaning is important. Here’s a fast routine:
- Cool pans: Let pans cool before washing.
- Scrape crumbs: Use a spatula or paper towel.
- Wash with warm water: If available, use biodegradable soap.
- Dry pans: Prevent rust, especially for cast iron.
Don’t dump water or scraps near camp; dispose of them at least 200 feet away.
Bread For Longer Camping Trips
If you’re out for several days, bread can be a lifesaver. Here’s how to plan:
- Pre-make bread: Bake at home, then reheat at camp.
- Mix dry dough: Carry pre-mixed dough in a bag. Add water and cook when ready.
- Store leftovers: Wrap bread in foil or zip bags. Eat within 2 days.
For variety, alternate between yeast bread and bannock.
Bread Around The World: Global Camping Traditions
Many cultures have their own camping bread. Here are some examples:
- Australian damper: Similar to bannock, baked in ashes.
- French pain de campagne: Rustic country bread, made with sourdough.
- Middle Eastern pita: Flatbread, cooked on hot stones.
- South African roosterkoek: Bread rolls cooked on grill.
You can try these styles for fun, or stick to the basics.
Advanced Tips: Baking Without Yeast
Sometimes, yeast is hard to carry or find. Here’s how to bake bread without it:
- Sourdough starter: Mix flour and water, let sit for 2-3 days to ferment. Use as a natural rising agent.
- Beer bread: Replace water with beer. The bubbles help bread rise.
- Self-rising flour: Contains baking powder and salt. Just add water and cook.
These methods create different flavors and textures.
Making Bread With Kids
Kids love making bread outdoors. It’s a great way to teach cooking and teamwork.
- Let kids mix dough: It’s messy but fun.
- Bread-on-a-stick: Safe and simple for younger campers.
- Decorate with seeds or herbs: Let kids add toppings.
Always supervise children around fire or hot pans.
Bread For Emergency Situations
Bread is useful during emergencies. If you lose your stove or food supplies, bread can be made with minimal tools.
- Use any flour: Wheat, cornmeal, or oat flour.
- Cook on hot rocks: Place dough on a flat, clean stone near fire.
- Wrap in foil: If available, wrap dough and place in coals.
Bread provides quick energy and comfort.
Bread For Backpackers And Ultralight Campers
If you carry everything on your back, bread can still fit in your meal plan.
- Choose light ingredients: Powdered mixes, minimal oil.
- Use small pans: Aluminum skillets are light and efficient.
- Eat immediately: Bread doesn’t keep well in humid conditions.
For overnight trips, bring pre-mixed dough for convenience.

Bread For Group Camping
Large groups need more bread. Here’s how to manage:
- Double recipes: Use bigger pans or Dutch ovens.
- Delegate tasks: Assign mixing, kneading, and cooking to different people.
- Serve buffet style: Cut bread into pieces for easy sharing.
Bread brings people together, and group baking is fun.
Troubleshooting: Fixing Bread Problems At Camp
Sometimes bread doesn’t turn out as expected. Here’s how to fix common issues:
- Too dry: Add a little water before cooking.
- Too wet: Sprinkle extra flour and knead again.
- No rise: If yeast is old or weather is cold, let dough rise longer.
- Burnt edges: Lower heat or move bread away from direct fire.
If bread fails, turn it into croutons or breadcrumbs for soup.

Bread As A Campfire Dessert
Bread isn’t just for meals. You can make sweet treats, too.
- Cinnamon sugar bread: Mix cinnamon and sugar into dough, cook as usual.
- Chocolate chip bannock: Add chocolate chips before cooking.
- Fruit-filled bread: Roll berries or jam into dough, then bake.
Kids and adults love these dessert breads.
Learning More: Resources For Camping Bread
Many outdoor sites offer tips and recipes for camping bread. For more ideas and techniques, visit Backpacker Magazine. You’ll find guides, videos, and real-life stories from campers.
Frequently Asked Questions
How Do I Know When Camping Bread Is Cooked?
Bread is done when the crust is golden, and a toothpick or knife comes out clean from the center. For Dutch oven bread, you can also check the internal temperature (should be around 190°F). If the bread feels heavy or sticky inside, it needs more time.
Can I Make Camping Bread Without Yeast?
Yes. You can use baking powder or self-rising flour for quick breads like bannock. These breads are flatter but still tasty. Sourdough starter or beer can also help bread rise without yeast.
What Type Of Flour Works Best For Camping Bread?
All-purpose flour is the most flexible and easy to use. Whole wheat flour adds fiber but makes bread denser. For gluten-free campers, use a gluten-free mix. Always pack flour in a waterproof bag.
How Do I Keep Bread From Burning Over A Campfire?
Use indirect heat. Place your pan or Dutch oven near—not on—the hottest coals. Rotate the pan every few minutes. For bread-on-a-stick, hold dough above the flame, not directly in it.
Is Camping Bread Safe To Eat If Cooked On A Stick?
Yes, if you use a clean, hardwood stick. Avoid sticks from pine or trees with toxic sap. Make sure bread is cooked fully before eating. Let it cool before touching, as it can be hot inside.
Camping bread is simple, versatile, and adds a special touch to outdoor meals. Whether you use a Dutch oven or just a stick, the process brings campers together and creates lasting memories. With the right recipe, equipment, and safety steps, you’ll enjoy fresh, warm bread wherever you go.
Try different variations, involve your group, and savor the taste of homemade bread under the open sky.