Knowing how to tie camping knots can make your outdoor experience safer and more enjoyable. Whether you’re setting up a tent, securing gear, or starting a fire, the right knot can save you time and effort.
In this guide, you’ll learn simple, step-by-step methods to master essential camping knots. By the end, you’ll feel confident handling ropes like a pro, making your next adventure smoother and stress-free. Ready to improve your skills and make your camping trips easier?
Let’s get started!
Credit: marscampers.com.au
Essential Knots For Camping
Camping knots are a key skill for every camper. They help secure tents, tie gear, and even save time. Knowing the right knots makes camping safer and easier. Each knot has a special use. Learning a few essential knots covers most camping needs.
Types Of Camping Knots
There are many knots, but some stand out for camping. The bowline knot creates a strong loop that won’t slip. The clove hitch is quick to tie and holds well on poles. The taut-line hitch adjusts tension on ropes, perfect for tent lines. The square knot ties two ropes of the same thickness together. Each knot serves a different purpose and is simple to learn.
Choosing The Right Knot
Choose knots based on what you need. For loops that stay firm, use the bowline. For tying rope to a post, the clove hitch works best. When you need to adjust rope tightness, pick the taut-line hitch. For joining ropes, use the square knot. Pick knots that fit your task and keep safety first.
Preparing Your Rope
Preparing your rope is the first step in tying camping knots. A good rope makes your knots strong and safe. Taking time to prepare helps avoid problems later. Knowing what rope to use and checking its condition is important. This section guides you through these steps clearly and simply.
Selecting Rope Material
Choose rope material based on your camping needs. Nylon ropes are strong and stretch well. Polyester ropes resist water and stay strong when wet. Natural fibers like cotton are soft but less durable. Pick a rope that fits your activity and weather. A good rope feels sturdy in your hands.
Checking Rope Condition
Always inspect your rope before use. Look for cuts, frays, or worn spots. Check for stiffness or hard areas. These signs mean the rope might break. Test the rope by bending it gently. If it feels weak, do not use it. Clean dirt or debris off the rope. Clean rope knots hold better and last longer.
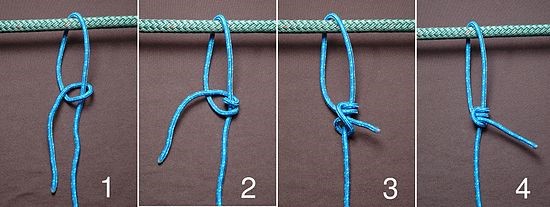
Tying The Bowline Knot
The bowline knot is a must-know for camping and outdoor activities. It creates a strong loop at the rope’s end that will not slip or tighten. This knot holds well under pressure but unties easily when needed. Learning to tie the bowline knot helps secure tents, tarps, and gear safely. Follow these simple steps to tie it correctly.
Step 1: Forming The Loop
Take the rope and make a small loop near the end. The loop should lie over the standing part of the rope. This loop is the base for your knot. Ensure the working end is on top of the standing part.
Step 2: Threading The End
Pass the rope’s free end up through the loop from below. Then, wrap it around the standing part of the rope. Bring the free end back down into the loop the same way it came out. Keep the rope smooth and untwisted.
Step 3: Securing The Knot
Hold the free end and the standing part. Pull both tight to secure the bowline knot. The loop should stay firm without slipping. Check the knot by pulling the loop and the rope ends separately.

Credit: woodlandwoman.ca
Creating The Clove Hitch
The clove hitch is a simple and useful knot for camping. It holds ropes tightly on poles or trees. This knot is quick to tie and easy to adjust. It works well for securing tents, tarps, or gear.
Follow these clear steps to create a strong clove hitch. Practice makes it easier and faster. Let’s start with the first step.
Step 1: Wrapping The Rope
Hold the rope in your hand. Wrap the rope around the post once. Keep the rope flat and tight against the post. Make sure the rope lies smoothly without twists.
Step 2: Crossing Over
Bring the rope across itself. Make an X shape on the post. Wrap the rope around the post again below the first wrap. Pass the rope under the X you made.
Step 3: Tightening
Pull both ends of the rope firmly. The knot tightens around the post. Check that the wraps stay in place. The clove hitch should hold steady and not slip.
Making The Square Knot
The square knot is one of the most useful knots in camping. It joins two ropes of similar thickness. This knot is simple to tie and holds well under tension. Knowing how to make a square knot helps secure gear and bundles quickly. Follow these easy steps to tie it correctly.
Step 1: Crossing Ends
Take the two rope ends you want to join. Cross the right end over the left end. Pull the right end under the left. This forms the first part of the knot. Make sure the ropes lie flat without twists.
Step 2: Repeating The Cross
Now take the same ends and cross again. This time, cross the left end over the right. Pull the left end under the right. The ropes should form a neat “square” shape. Check that the knot looks symmetrical.
Step 3: Final Tighten
Hold both ends firmly. Pull them in opposite directions. The knot will tighten and lock in place. Avoid pulling too hard to keep the ropes from damaging. The square knot is now secure and ready to use.
Forming The Taut-line Hitch
The taut-line hitch is a useful camping knot. It allows you to make a rope tight and adjustable. This knot works well for securing tents and tarps. It holds firm but lets you change the rope’s length.
Follow these simple steps to form the taut-line hitch. You will learn how to wrap, loop, and lock the knot.
Step 1: Wrapping Around Object
Start by wrapping the rope around a solid object. This could be a tent stake or tree. Make sure the rope lies flat and not twisted. Leave enough rope to work with for the next steps.
Step 2: Creating Adjustable Loops
Take the loose end of the rope and wrap it around the standing part. Make two loops inside the first wrap. These loops slide to adjust the rope’s tension. Keep the loops tight but easy to move.
Step 3: Locking The Knot
Finish by making one more loop outside the first wraps. Pass the loose end under this last loop. Pull tight to lock the knot in place. Test the knot by sliding it and checking its hold.
Tips For Knot Safety And Durability
Knots are essential for camping safety and durability. A poorly tied knot can slip or break, causing accidents. Strong, secure knots hold gear, tents, and ropes firmly. Follow these tips to keep your knots safe and lasting longer.
Checking Knot Security
Always test your knot after tying. Pull the rope firmly to check if it holds. If the knot slips or loosens, retie it. Tighten the knot to remove slack. Use your fingers to feel for any weak spots. Inspect knots regularly during use to avoid surprises.
Avoiding Common Mistakes
Do not rush when tying knots. Take your time to follow steps carefully. Avoid twisting or crossing ropes incorrectly. Keep ropes clean and dry for better grip. Replace worn or frayed ropes to prevent failure. Practice knots often to build confidence and skill.
Credit: seekoutside.com
Frequently Asked Questions
What Are The Essential Camping Knots To Learn First?
The essential camping knots include the bowline, clove hitch, and square knot. These knots are versatile and secure for most camping tasks. Learning these basics helps you tie tents, secure gear, and create shelters efficiently while camping.
How Do I Tie A Strong Bowline Knot Step By Step?
To tie a bowline knot, form a small loop near the rope’s end. Pass the rope’s tail through the loop, around the standing part, then back through the loop. Tighten firmly. The bowline creates a secure, non-slip loop for camping needs.
Why Is The Clove Hitch Knot Useful For Camping?
The clove hitch knot is quick and easy to tie. It securely attaches ropes to poles, trees, or tent stakes. Its adjustability makes it ideal for setting up tents and tarps. The knot holds well but is easy to untie when needed.
Can Beginners Easily Learn To Tie Camping Knots?
Yes, beginners can learn camping knots with practice. Start with simple knots like the square knot and bowline. Use step-by-step guides and practice regularly. Mastering these knots improves safety and efficiency during camping trips.
Conclusion
Tying camping knots takes practice and patience. Start with simple knots and try them often. Each knot has a purpose and use in camping. Knowing the right knot helps keep you safe outdoors. Keep your rope handy and practice these steps.
Soon, tying knots will feel easy and natural. Enjoy your camping trips with confidence and skill. Stay safe and have fun exploring nature.