You probably know how challenging a tent setup can be if you have ever been camping. Things may get even worse when the wind blows too hard or there’s a rainstorm.
Not only can such circumstances get you soaked up and make the tent setup impossible, but you suddenly may not have a tent at all.
However, if you have your guy lines set up, you need not worry about the tent’s stability or your dryness and shelter.
They can prevent your tent from blowing away or tipping over by securing it to the ground with stakes, ensuring your camping experience is as enjoyable as possible.
So let’s learn how to use tent guy lines correctly, so your tent remains stable under any conditions.
What Are Tent Guy Lines? Are They Really Necessary?
Guylines, guy lines, or guy ropes are pieces of rope, cord, or tassels that are typically used to secure tent walls, rain flys, and tarps to the ground.
They can be essential for tents for several reasons. Depending on the tent’s size and style, they can either be crucial for tent set up or just an option.
A tent with guy lines has some of the following advantages:
- The tent’s structural stability
- Air circulation inside the tent
- Protection against rain or wind
- Maintenance of the tent’s standing upright
- Reduced noise or flapping
- More space inside the tent
Accessories Needed For Setting Up Guylines
When you go camping to some off-the-beaten-track place, you should bring guylines accompanied by a few accessories with you to secure your tent tightly against the strong winds and rain.
These accessories include:
- Triangle Rope Tighteners
- Guy Line Tensioners
- Reflective Utility Cord Kit
- Ropes or cords
- Cord or Rope Adjusters
- Stake Kits
- Hammer
- Reflective Glow Wire
- Pegs
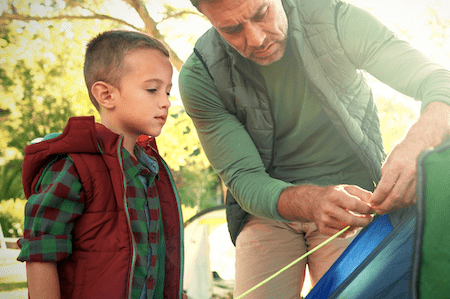
3 Steps To Setup And Use Tent Guy Lines
There’s nothing complicated about hooking up guy lines – all it takes is a couple of quick knots in three easy steps to get your tent up and running.
Below are the steps to follow.
Step 1: Secure One End Of A Guy Line To The Tent

Look for loops in your tent or tarp, nicknamed “guy out loops.” Usually, you’ll find them near the corners. There may be some more along the walls or near the edges. You can use each of these loops to affix your guyline.
Almost anything should work for it, from string to cord to twine. However, opting for an ultralight backpack reflective cord is a reasonable precaution against any kind of fall-on-the-face.
Also, there might be guylines already attached to your tent by the manufacturer. But remember, not all manufacturers provide long enough lines or tie their lines properly. So, you may want to cut them off and get your own.
Furthermore, when you source your own, you will have the ability to configure the length on your own (the usual is 3 feet per guy line).
After you have identified the points of your tent or tarp that you would like your guyline to be attached to, you need to tie a knot on the guy out loop.
To ensure it is secure, either fix it (unadjustable) or tighten it (tighten with tension). Ideally, you should use either a bowline knot (unadjustable) or a clove hitch (two half hitches, tightened with tension).
Step 2: Choose An Anchoring Method And Adjust Accordingly

Now, decide which anchors you want to use. While it’s always ideal to go with stakes, you may need to use weighted rocks, trees, or logs if the ground is extremely rocky, too hard, or overly soft (muddy or sandy).
Attaching the line to the anchor points can be done via a large variety of methods. But adjustability is what matters most.
By extending or shortening the guy line, you might be able to identify additional anchor points (which gets tricky sometimes).
The tensioners method (or tighteners) is supposedly the least stressful line adjusting method. In the absence of a tensioner, however, you can use a variety of knots.
Alternatively, you can also try making a tensioner using the top of a soda can. As for the knot, you can rely on the classic boy scout taut-line hitch when staking down your tent.
Step 3: Stake Down The Tent Correctly

After you’ve tied your knot or set the tensioner loop, all that’s left is to stake it down. If needed, you can make the necessary adjustment to the tension and length.
To achieve the most secure anchor possible, keep the stake at a 45-degree angle toward the tent and keep the line straight and perpendicular.
Without that, the stake will just extend the guy line with barely any resistance if it’s angled outward and away from the tent.
There’s even a chance it will pop out if any force is applied to it.
A Few More Tips For Using Guy Lines

The following are some additional tips for working smarter with guy lines.
Use Colorful Cords
Guy lines are invisible in low-light conditions. So, be sure to avoid tripping over guy lines by using brightly colored cords or ropes for them.
You can attach a few orange flagging tape pieces to each line in the absence of reflective or bright guy lines. That way, you won’t faceplant at twilight.
Do Anchoring At The End
During the setup of freestanding tents, you should do all the anchoring (applicable to both the tent and the guylines) at the last minute.
When you do so before the rest of the tent is set up will bring more headaches and make your tent less structurally sound.
Keep Guy Lines Taut
Try to keep your guy lines taut, yet not excessively so, as you won’t want the fabric to stretch too much and rip.
Buy Quality Stakes
Stake your money on good stakes. When you can buy a standard stake for less than a dollar, it may sound silly to spend a few bucks on one.
But the truth is, cheap stakes don’t last long. Although they work great on soft ground, setting up a tent in the dark and dealing with bent or twisted stakes can be such unnecessary pain.
Moreover, if you own an extra-large tent for 12 people, you must have the strongest stakes.
Those like the ABCCANOPY Tent Stakes are sturdy enough to maintain their straightness for many camping trips to come.
Learn How To Knot Beforehand
Prepare beforehand by practicing your knots! Learning a knot while erecting a tent is about the worst time possible, especially when losing daylight.
Be sure to spend some time practicing tying your guy lines before heading out.
Be Cautious About Driving Stakes
Don’t drive a stake straight into the ground, for it will result in the stakes popping out when you press down the stakes.
Frequently Asked Questions
What’s The Purpose Of Guylines?
Guylines serve two key purposes by connecting to the loops on rain flys in tents before getting staked onto the ground near the tent.
Firstly, they help minimize the possibility of leakage by keeping the rainfly out of the tent body.
Secondly, guy lines improve the tent’s strength and stability to prevent the poles (make sure you have the right type of tent pole) from flexing excessively and potentially snapping in high winds or winter storms.
How Long Should Your Tent Guy Lines Be?
For A-frame tarps, the average guy line length is between 4 and 6 feet, depending on the tent’s side height, while it’s usually 8 feet for the ridgeline.
Additionally, you’ll prefer a 3 feet guy line for ground-level sides and corners.
Which Knot Is The Best To Use For A Guy Out Loop?
The bowline knot. There is barely any jamming to this knot, and it is simple to tie and untie. And best of all, it’s stable, reliable, and solid.
What’s The Best Alternative To Stakes When Securing Guy Lines?
You can tie your guylines to rocks, stumps, logs, tree limbs, or anything else that will hold them down when you don’t have tent stakes to secure them or when the ground is not firm enough for them.
Although tent stakes are the best way to secure your tent, you can stick to whatever you have handy.
What’s The Best Alternative To Tensioners When Securing Guy Lines?
The two half hitches knot and the taut-line hitch. When you tie the first when connecting your guy lines to the loops and the second when connecting them to the stakes, the knot at the top is firm and stable.
Besides, the knot easily adjusts without loosening.
How Should You Store Your Guy Lines?
You should wrap the guy lines around your hand to prevent them from tangling when storing. Tie the line together with one of the free ends after pulling the wrapped line from your hand.
You can stash your guylines along with the stakes in a tent vestibule or pockets on the tent.
Final Word
Guy lines are often indispensable, especially when you’re settling in somewhere wild and unpredictable.
They, like stakes, do exactly what’s needed while backpacking and camping – they keep your tent stable and secure, particularly in windy or stormy conditions.
And now that you know how to use tent guy lines, go ahead and hike or camp as you always have and with complete confidence.
Hopefully, with the right tools and the proper knowledge, you can set up your canopy tent correctly every time with no hassle.