Are you ready to make your hikes easier and more enjoyable? Using hiking poles the right way can help you hike longer, reduce strain on your knees, and keep your balance on tricky trails.
But if you’re new to hiking poles, it might feel confusing or awkward at first. Don’t worry—this guide will show you exactly how to use hiking poles properly, step by step. By the end, you’ll feel confident and ready to tackle any path with more stability and less effort.
Keep reading to discover simple tips that will change the way you hike forever.

Credit: www.rei.com
Choosing The Right Poles
Choosing the right hiking poles can improve your hiking experience greatly. The correct poles provide support, reduce strain, and increase balance on trails. Picking the right poles depends on several factors like your hiking style, terrain, and comfort. Understanding the types, materials, and length options helps you find the best poles for your needs.
Types Of Hiking Poles
There are mainly three types of hiking poles. Single-shaft poles are simple and strong. They suit beginners and steady terrain. Trekking poles have adjustable sections and are lightweight. They work well on rough or changing trails. Shock-absorbing poles reduce impact on joints. These poles are good for long hikes or downhill walking.
Materials And Weight
Hiking poles come in different materials like aluminum and carbon fiber. Aluminum poles are durable and usually cheaper. They handle rough trails well but can be heavier. Carbon fiber poles weigh less and absorb vibrations better. These poles cost more but reduce fatigue. Choose poles that feel strong but light enough to carry.
Adjustable Vs Fixed Length
Adjustable poles let you change their length easily. This feature helps on different slopes and terrains. You can shorten poles for uphill and lengthen for downhill. Fixed-length poles have one set length. They are simpler and often lighter. Adjustable poles offer more flexibility for varied hikes. Fixed poles work well on flat or gentle trails.
Adjusting Pole Length
Adjusting hiking pole length correctly makes walking easier and safer. Poles that are too long or too short can cause discomfort or reduce balance. Changing pole length helps keep your body in a good position on different slopes. Learn how to set your poles for flat ground, uphills, and downhills.
Correct Height For Flat Terrain
Stand straight with your arms relaxed at your sides. Hold a pole upside down with the grip touching the ground. Adjust the pole length until your elbow forms a 90-degree angle. This height keeps your arms comfortable and helps push off the ground. It gives good support without straining your shoulders or wrists.
Adjustments For Uphill And Downhill
Shorten poles by about 10 to 15 centimeters for uphill climbs. This helps you lean forward and use poles to push up. It reduces pressure on your legs and knees.
Lengthen poles by 10 to 15 centimeters for downhill walking. Longer poles give better balance and reduce impact on your joints. They help you slow down and keep control on steep slopes.
Proper Grip And Strap Use
Using hiking poles correctly makes your hike easier and safer. Proper grip and strap use help reduce hand fatigue. They also improve your balance on rough paths. Learn how to hold the poles and use the straps to get the most from your poles.
Holding The Poles Correctly
Hold the pole grip firmly but not too tight. Your hand should wrap around the handle comfortably. Keep your wrist straight, not bent. This helps prevent strain during long hikes. The pole tip should touch the ground near your feet. Swing the poles naturally with your steps. Adjust your grip if you feel discomfort or numbness.
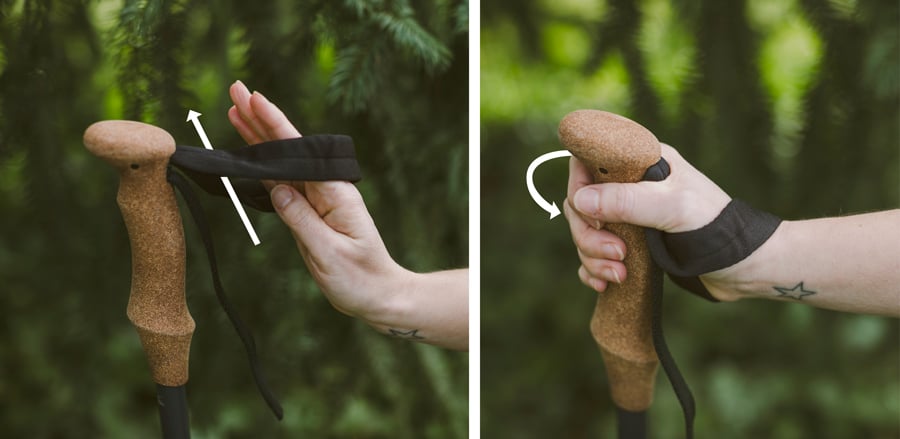
Using Wrist Straps Effectively
Slip your hand up through the wrist strap from below. Then grip the handle over the strap. This gives support without squeezing the handle too hard. The strap takes some weight off your hands. It also helps you push the pole forward easily. Adjust the strap for a snug fit, not too loose or tight. Avoid letting the strap cut into your wrist. This use saves energy and keeps your hands relaxed.
Walking Techniques With Poles
Using hiking poles improves your walking comfort and safety. Proper walking techniques help you move smoothly and use less energy. Understanding how to move your poles with your steps is key. This section explains simple methods to walk well with hiking poles.
Coordinating Pole Movement
Move your poles opposite to your feet. When your right foot steps forward, push the left pole forward. This action helps balance your body. Keep your arms slightly bent, not stiff. Plant the pole tip firmly on the ground. Let the poles support your forward motion. Practice this rhythm to avoid tripping or losing speed.
Maintaining Balance And Rhythm
Keep a steady pace with your poles and steps. Your poles should touch the ground before each foot lands. This timing helps keep you stable on rough trails. Use poles to steady yourself on uneven or slippery surfaces. Maintain a relaxed grip on the handles. Tight grip causes fatigue and reduces control. Walking with a steady rhythm reduces muscle strain and keeps your body balanced.
Safety And Maintenance Tips
Using hiking poles correctly means taking care of them and staying safe. Poles need regular checks and cleaning. This keeps them strong and ready for your hike. Following simple safety and maintenance tips helps you avoid accidents and extend pole life.
Inspecting Poles Before Use
Check poles for cracks or dents. Look at the locks and joints. Make sure they open and close smoothly. Test the grips to see if they are secure. Look at the tips to ensure they are sharp and not worn out. Broken poles can cause falls or injuries. Always inspect poles before starting your hike.
Cleaning And Storage
After hiking, wipe poles with a damp cloth. Remove dirt and mud from tips and joints. Avoid using harsh chemicals that can damage materials. Dry poles completely to prevent rust or mold. Store poles in a cool, dry place. Keep them away from direct sunlight and moisture. Proper cleaning and storage increase pole durability.
Credit: www.rei.com

Credit: www.youtube.com
Frequently Asked Questions
How Do I Adjust Hiking Poles To The Right Height?
Adjust hiking poles so your elbows form a 90-degree angle. This ensures proper support and reduces strain on wrists. Adjust them shorter for uphill climbs and longer for downhill for better balance and comfort.
When Should Beginners Use Hiking Poles On Trails?
Beginners should use hiking poles on uneven, steep, or slippery trails. Poles improve stability and reduce joint impact. They help build confidence and improve endurance on long hikes.
How Do I Hold Hiking Poles Correctly?
Hold poles with a relaxed grip and use wrist straps for support. Keep your wrists straight to avoid strain. Push down with your arms, not just your hands, to maximize efficiency.
Can Hiking Poles Prevent Injuries For Beginners?
Yes, hiking poles reduce stress on knees and ankles. They improve balance on rough terrain, lowering fall risk. Poles help distribute weight evenly, making hikes safer and more comfortable.
Conclusion
Using hiking poles helps you walk with better balance and less strain. Hold the poles with a relaxed grip and keep your arms bent. Adjust the length to fit your height and the trail slope. Step with the opposite foot to each pole for smooth movement.
Practice on easy paths before harder trails. Enjoy your hike safely and comfortably. Poles make hiking easier and more fun. Try these tips on your next walk.